If you want to become a successful streamer, video and webcam quality are essential to your success.
Today, I will show you how to maximize the performance of your streaming webcam without spending a lot of money on an expensive camera.
Without further delay, let’s begin!
Setting Up the Webcam
First things first. Before I provide you with any tips and tricks to enhance the video quality of your webcam, we need to configure the webcam within the streaming software you will be using.
For this guide, I used Streamlabs; however, most of the information presented here will also apply to OBS.
Let’s explore it step by step!
Step 1: Add Webcam
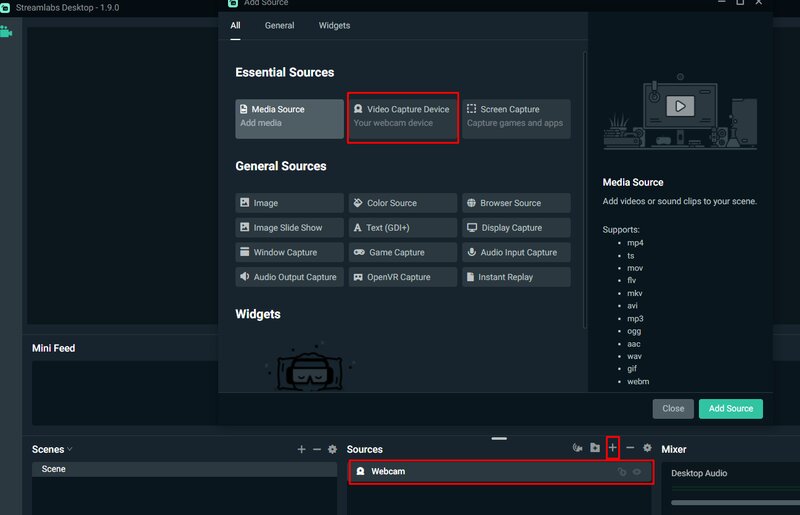
After launching Streamlabs, click on the “+” sign in Sources > Video Capture Device to add your webcam.
Step 2: Enable Custom Settings
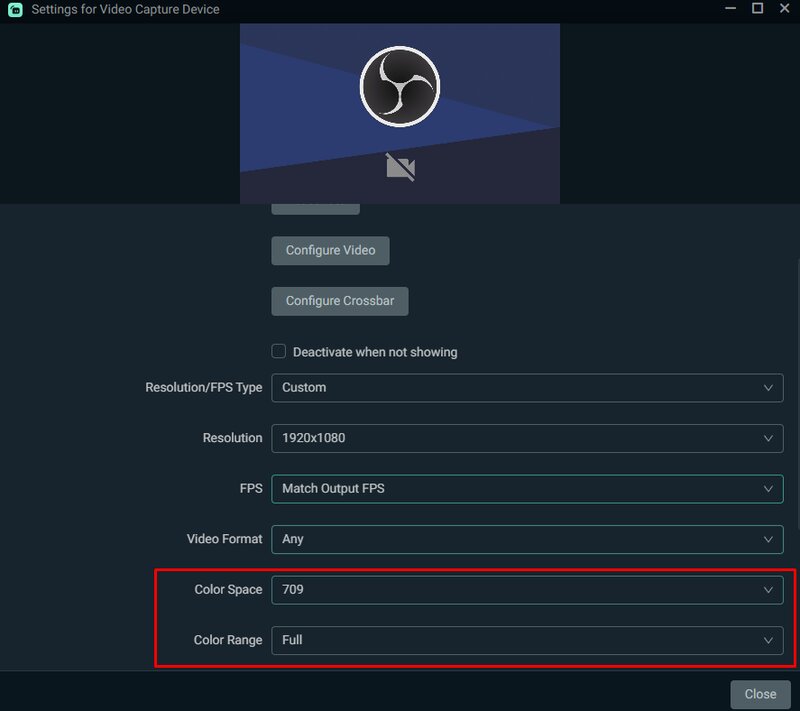
Right-click on the webcam in Sources > Properties and change Default settings to Custom.
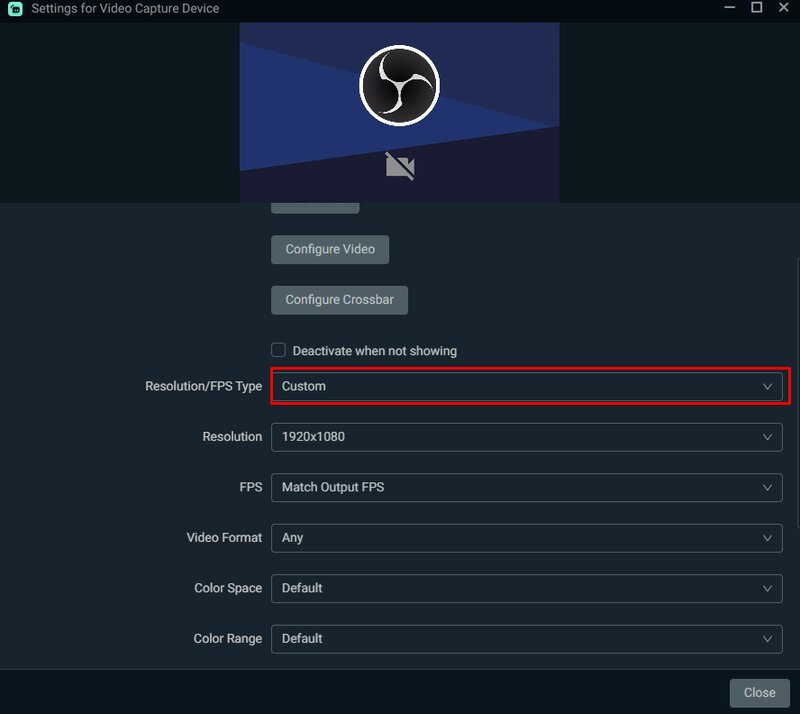
Here, you can adjust the settings as you prefer. We recommend using the 30 FPS limit, as 60 FPS may cause some lag.
Additionally, depending on your configuration, you may prefer to stream your webcam at 720p rather than 1080p. However, this is not a universal recommendation, so we leave it to your discretion.
You can also adjust the Color Space and Color Range. The recommended settings are to set the Color Space to 709 and the Color Range to Full.
Step 3: Disable Automatic Settings
While still in the Webcam Properties, click on Configure Video and uncheck all automatic settings.
Step 4: Adjusting Exposure
After that, adjust the Exposure to a level that does not cause your video to lag. For us, this is set to -5.
These will be the default settings you should start with to further adjust the filters and other settings I will mention later.
Keep in mind that the image you see may vary depending on the room and the natural lighting it receives.
If you stream in a dimly lit room with little natural light, the image will appear dark, and you will need to adjust other settings later on.
However, there is a downside to this. If you adjust the webcam settings excessively, the quality may decrease, depending on the webcam you are using.
The issue with webcams is that their image processing, along with their smaller sensors, does not match the quality of some of the more expensive cameras used for streaming, such as DSLR cameras.
Today, I’m here to assist those who cannot afford to purchase one of these. However, this is something you should keep in mind.
Using Streaming Lights
Most professional streamers utilize various stream lights to enhance the quality of their webcams.
There are several types of streaming lights, and today, I will discuss the most important ones.
Key Lights
First, let’s begin with the Key Lights. As their name implies, these lights are designed to illuminate the key areas of your stream, primarily the streamer themselves.
However, these tend to be a bit more expensive, so consider exploring the cheaper options first if you are new to streaming.
Ring Light
If you are looking for a more affordable alternative to Key Lights, consider getting a Ring Light. Ring lights are typically much less expensive and are recommended for new streamers and content creators.
With most of these lights, you can conveniently customize the brightness using your mobile phone.
Some webcams, like the Razer Kiyo, come with their own ring light.
How to Use Streaming Lights?
When using streaming lights, they not only help to highlight the streamer but also improve the quality of your webcam capture.
For instance, if you have a background light that is very bright, you can reduce the light settings in your streaming software while increasing the light from the ring light.
Understanding White Balance
Now that you have your streaming light, let’s return to the Streamlabs webcam settings!
Another setting I want to highlight separately, as it is very important, is the White Balance.
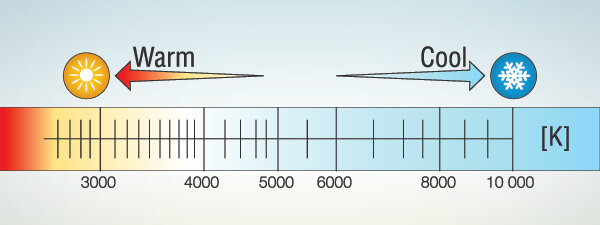
White Balance essentially refers to the adjustment of color temperature. This range is represented on a scale from warm to cold and vice versa.
Depending on your room lighting and the artificial stream lighting you are using, you can adjust the White Balance in the Streamlabs Webcam settings to your preference.
The goal is to balance the lighting so that your face color appears natural. With some webcams, you may notice that your face has a greenish or bluish tint.
Webcam Positioning
You may own the most expensive camera, yet still appear unflattering on stream. One of the essential aspects to consider is selecting an appropriate position for your webcam.
You don’t want to position it too high, as that would show the top of your head, nor too low, as that would emphasize your chin excessively. Both options appear unprofessional and odd.
What you should do is try to find a middle ground and align the webcam with your eyes.
Webcam Capture
Another crucial factor to consider when positioning the camera is the background it will capture.
Most streamers typically broadcast from their bedroom, living room, or another area of their home.
Therefore, it is understandable that you might notice some items lying around that are not directly related to the stream, just some everyday life objects.
However, viewers are observant and often comment on such details. Remember, streaming involves more than just playing a game or turning on your camera to talk to people. In this profession, every little detail is important.
Therefore, you should be mindful of what your webcam captures. One helpful tip we can offer is to personalize your background to make it more engaging.
If you are a gamer, you can include specific gaming details or use captivating RGB strips on the wall behind you.
Green Screen
If you stream in a small space where people frequently walk by, it may be wise to use a green screen rather than trying to manage the stream background.
These are typically very inexpensive; you can find a green screen for as little as $20 or $30.
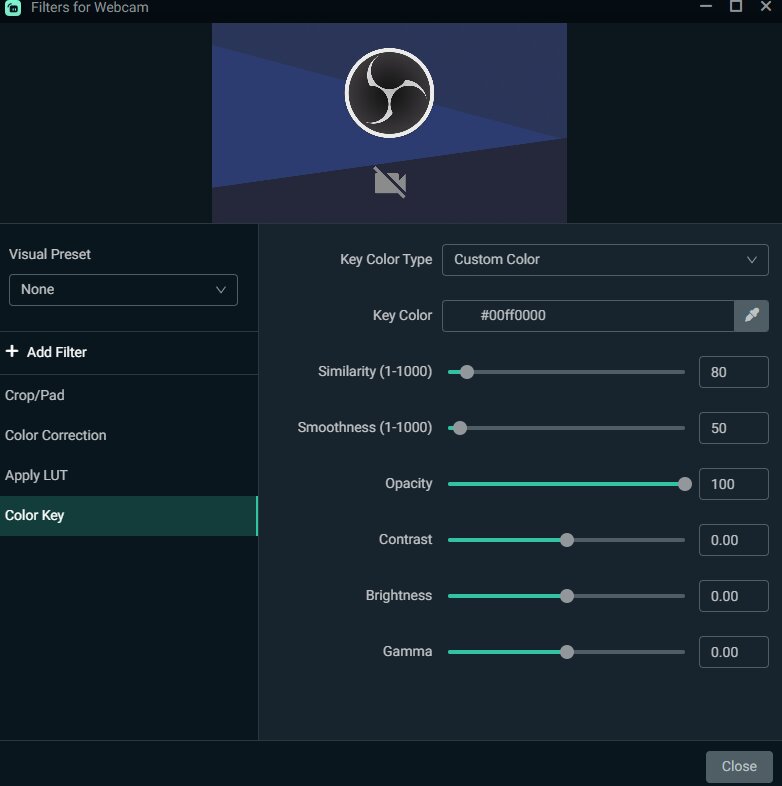
To add a Green Screen to Streamlabs, navigate to Filters > Edit > Add Filter > Color Key and switch to Custom Color.
Select your green screen and begin adjusting the settings until the green edges and blurs are no longer visible.
For this, it is also important to properly light and position your green screen, so you won’t need to use multiple color keys to remove the background.
Cropping Webcam in Streamlabs
Another way to customize the Webcam Frame is by cropping it in the streaming software. To achieve this, you need to add the Crop/Pad Filter.
This can be done by right-clicking on the Webcam in Sources > Filters > Edit Filters.
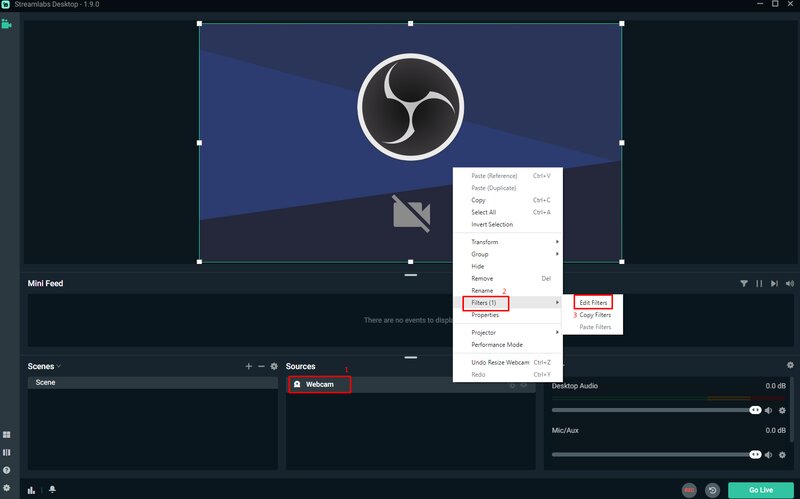
In the new window, click on Add Filter and select Crop/Pad from the drop-down menu.
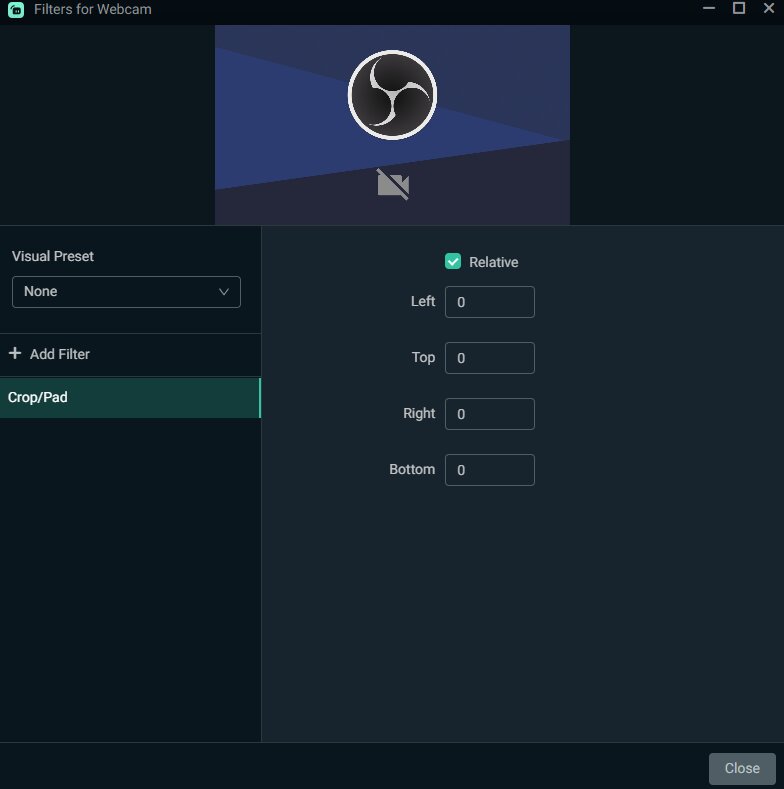
By adjusting the values, you can crop each side and obtain the preview above. Once you are satisfied, just close the window.
Color Correction
Now that everything else is set up, let’s return to the default settings we discussed at the beginning of the article. It’s time to adjust them slightly.
Color correction can be performed in two ways.
First, if you return to the Webcam Settings, you can modify properties such as Brightness, Contrast, Saturation, and more.
Another option is to add a separate filter in Streamlabs Go by navigating to Filters and selecting the Color Correction filter. From there, you can adjust the values until you are satisfied with the appearance of the webcam.
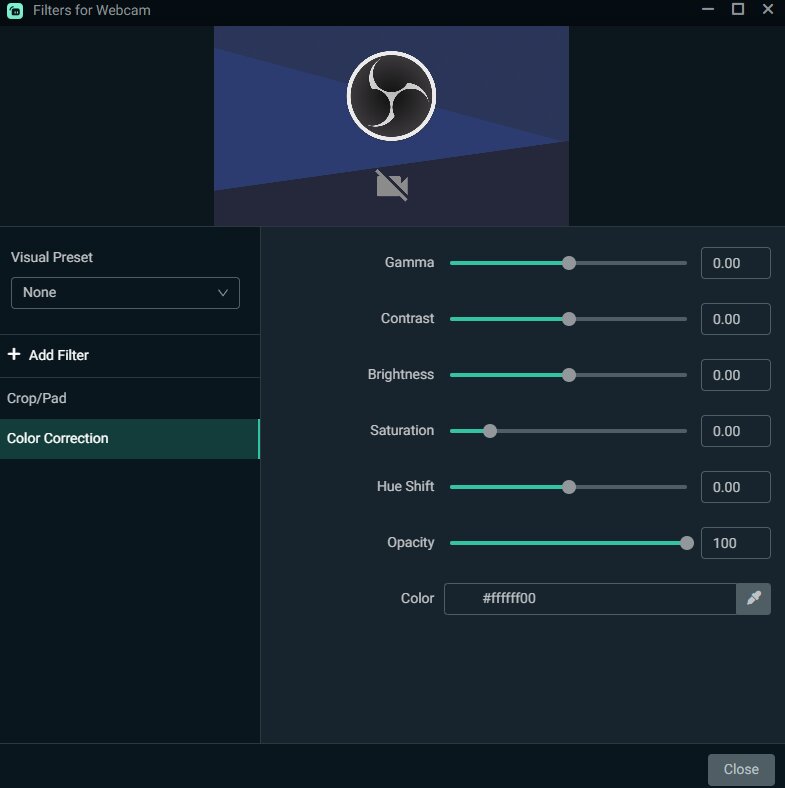
Remember what I mentioned at the beginning. If you alter these settings excessively, the quality of your image may significantly degrade. Therefore, aim to find the right balance and make only minor adjustments.
LUT Filter
The last topic I want to discuss is LUT filters. If you’re new to streaming, you may be wondering, what is a LUT filter?
The simplest way to explain it is that LUT Filters are webcam filters akin to those available on social media platforms like Instagram.
Before posting a photo on Instagram, you can apply various filters to adjust the color, saturation, blur, and more.
Well, a LUT filter performs the same function for your webcam. To add LUT filters, you need to download them from the internet.
Once you’ve completed that, simply navigate to Filters>Edit>Add Filter and select Apply LUT from the drop-down menu.
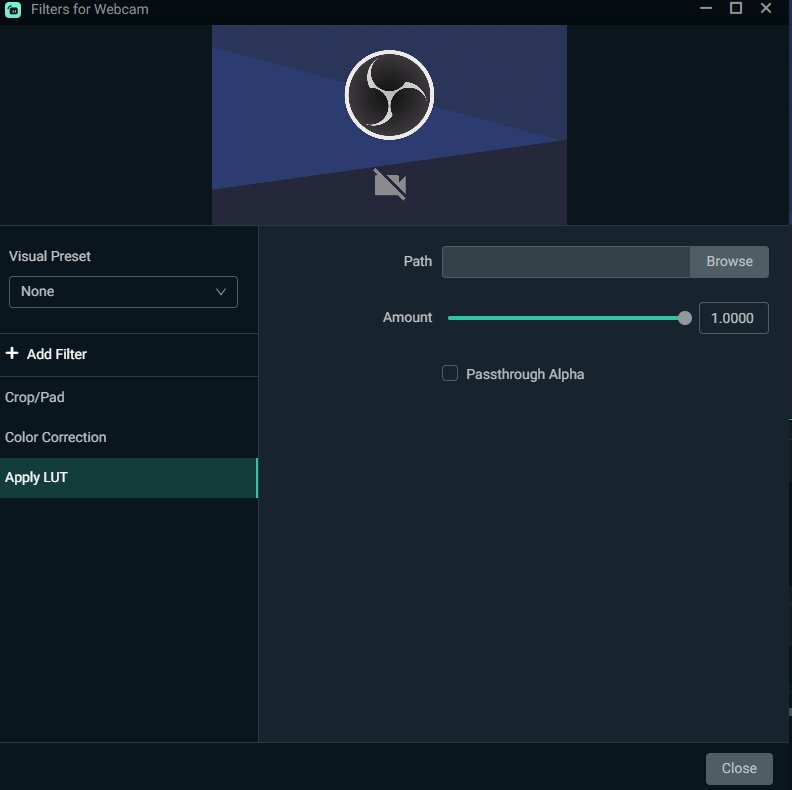
Next, click Browse and locate the folder where you saved all the LUTs. From there, make the necessary adjustments until you are satisfied with the appearance of everything.
Conclusion
That concludes everything I had in store for you today! You've learned how to maximize the potential of your webcam and enhance the liveliness and cheerfulness of your streams.