This article discusses the ideal microphone placement that every streamer should consider.
After reading this text, you will be able to create the best possible videos without encountering any issues related to the sound quality of your live stream.
Furthermore, if any issues related to the microphone arise, you will know how to resolve them.
Below are the main topics of our article:
Therefore, let us get straight to the point and learn where to position our microphones.
Table of Contents
Best Mic Placement for Streaming
Sound quality is essential for every streamer.
A streamer may produce the best possible content, whether they stream games or edit their vlogs, but if the sound quality is poor, it will detract from the entire video.
Therefore, pay attention to every detail on our list, as it will help you create professional-sounding live streams.
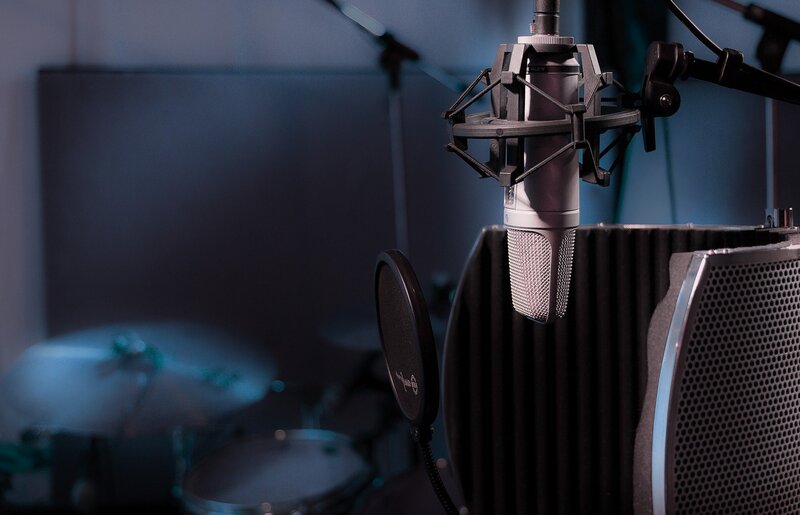
1. Ideal Location for Clear Sound and Acoustics
The first and most crucial piece of advice is to find the correct microphone position, often referred to as the “Sweet Spot.”
As you might expect, the ideal position is where your mic performs optimally.
The “Sweet Spot” is typically located close to the sound source and in the room or studio’s most acoustically favorable area.
Our team has compiled some advice regarding the three general types of microphones: microphones with boom arms, headset microphones, and free-standing microphones.
While microphones of the same class may vary, some universal guidelines for positioning can be established.
Positioning the Microphone Boom Arm
The most common type of microphone is likely one with a boom arm.
Streamers choose it because the microphone boom arm allows them to adjust the mic’s position for optimal sound quality.
We recommend placing them on the right or left side of your desk, as this will not obstruct your view.
Moreover, they are practical for gamers who live stream and frequently use their keyboards, as they allow for free movement of your arms beneath the boom arm.
If necessary, your boom mic can be adjusted to be moved away or brought closer.
Positioning a Headset Microphone
With a headset mic, ensure that the microphone is positioned about one inch away from your mouth.
Just ensure that your mic is angled toward your mouth.
Placing a headset microphone directly in front of your mouth may be unpleasant for your viewers, as they will hear your breathing or mumbling when you speak directly into the microphone.
Positioning a Free-Standing Microphone
If you prefer not to use headsets or boom arm microphones, a free-standing microphone is the ideal choice for live streaming.
Generally, the rule is to position them on your desk at a reasonable distance, 6-12 inches away from your mouth.
However, we recommend that you pay closer attention to whether it is one of the condenser microphones or dynamic microphones, as the distance can also vary depending on the type.
Condenser microphones are typically positioned about 15-20 cm or 6-8 inches away, while dynamic microphones should be placed 5-7 cm away.
If you position your microphone closer to your mouth, your streamers will pick up the breathing sounds, which are not very pleasant to hear.
Conversely, if you position it more than 12 inches away, your microphone will likely capture background noise.
It goes without saying that you should direct the microphone towards your mouth to produce quality audio.
2. Choose the Right Polar Pattern
To position your microphone correctly, you must understand the polar pattern of your mic.
This is because some modes are designed for capturing music, some for sounds from the user’s environment, and others specifically for streamers’ voices.
There are four polar patterns: stereo, omnidirectional, bidirectional, and cardioid mode.
Today, some microphones feature selectable pickup patterns, allowing you to access multiple polar patterns within a single microphone.
Thus, you do not need to purchase multiple microphones for various occasions.
If you are looking for the ideal XLR microphone, take a look at our other article on XLR microphones here.
However, let us return to the polar patterns.
Firstly, regarding your streaming setup, we recommend obtaining a microphone with a cardioid pattern.
Specifically, the pattern mentioned above effectively minimizes background noise, making it highly recommended for streamers who prefer to speak directly into the mic.
The only thing you need to remember while using this mic is to keep it a few inches away from your mouth.
Secondly, if you frequently interview other streamers or friends, opt for the bidirectional pickup pattern, as it captures sound equally from both sides of the microphone.
Finally, if you want to capture ambient vibrations from concerts or multi-person podcasts, you should choose an omnidirectional or stereo pattern.
3. Avoiding Capturing Background Noise
We understand that most streamers do not broadcast from isolated studios, apartments, or houses.
Conversely, many streamers frequently reside in noisy apartments or houses, which can pose challenges for live streaming.
Therefore, a streamer should position the microphone in a location that is not too close to external sound sources.
First, ensure that your desk (and microphone) is positioned away from the windows if you live on a noisy street.
If you cannot place the desk away from the window due to limited space, at least keep the windows closed while you stream.
Moreover, today, it is possible to purchase affordable accessories and noise reduction tools, such as foam panels or noise-reduction curtains, so consider acquiring one of these options.
Secondly, we often hear fans and air conditioners operating in the background while watching a streamer.
A streamer can quickly eliminate those sound waves by simply turning off the fans or air conditioning.
Finally, always test your microphone before creating content or starting to stream.
If needed, adjust the position of your microphone frequently.
Cardioid mode is advantageous as it captures everything you say directly into the microphone.
However, proper placement and checking before use will ensure clear audio and enhance the quality of your videos.
4. Purchase a Shock Mount or a Pop Filter
Proper placement of a microphone is one of the most important factors.
However, some undesirable low frequencies may still occur even if the microphone is positioned perfectly.
Free-standing and boom-arm microphones are often susceptible to capturing sounds from knocking on your desk or typing on your keyboard.
Therefore, we recommend purchasing a shock mount that will stabilize your microphone and prevent it from capturing unwanted sounds from the environment.
Furthermore, the shock mount enables you to position your microphone at a higher level, safeguarding it from any potential contact.
Based on our experience, a shock mount proved beneficial when we encountered an issue with our professional USB microphone, the Blue Yeti.
The Blue Yeti has extremely high microphone sensitivity, so a shock mount is necessary for our Twitch streams.
Conversely, if you prefer not to sound as though you have adjusted the microphone gain knob and want to avoid harsh plosive sounds such as P’s, K’s, and T’s, we suggest purchasing a pop filter.
It will prevent distortion in your audio, allowing you to gain control over those sounds.
However, we do not believe that the filters are absolutely essential, but they would certainly be a valuable addition for any YouTube or Twitch streamer nonetheless.
FAQ
What to do if my room is too acoustic?
Bear in mind that there is a vast difference between flat and vaulted ceilings. Namely, if your room has a vaulted ceiling, it would be great for watching movies or listening to music, but for streams, it would echo a lot. Therefore, we can only recommend you avoid them. On the other hand, a flat ceiling with some carpets over the floor will help you eliminate the echo and create a better sound. It is impossible to eliminate every external sound wave, but the rule is that the more objects you have in the room, the fewer sound waves will appear.
What is the best distance from my mouth to the microphone?
It depends on whether you use dynamic microphones or condenser microphones. When it comes to the condenser microphones, we recommend a distance of 15-20 cm from your mouth, while the dynamic should be 5-7 cm away. However, many condenser microphones have their own recommendations that you can read in their manuals. Therefore, we suggest you try the microphones yourself and choose the best microphone distance for your Twitch stream.
Conclusion
Even the finest microphones must be positioned correctly to perform at their best.
Therefore, we recommend that you pay attention to every detail of your microphones—from their pickup pattern and position to other sound sources in the vicinity.
By reading this article, we hope you will understand what you need to do to create optimal conditions for streaming, enhance your audio quality, or eliminate the popping sounds caused by various factors.
For additional tips on how to make your microphone sound great, please check the video below!
