While it may seem unusual, many people are interested in the option to stream OBS to Discord. Sharing your entire screen on a PC or Android device may appear to have limited utility.
However, if you are a streamer, this provides a new way to engage with your audience. The only issue is that streaming to Discord using OBS requires a complicated process, especially if you want more than just a partially functioning stream. That’s why we will show you how to stream OBS to Discord.
How To Configure OBS Studio
When you launch OBS Studio, it will automatically configure all the necessary settings. If you're streaming, select "Optimize for streaming" from the drop-down menu and then proceed. For optimal results, use a 1080p resolution with a frame rate of 60, provided you have a high-performance computer.
Since we will be broadcasting via Discord this time, you won't need to choose between Twitch or YouTube as you normally would. Once you finish configuring your broadcast, you can start adding a source and a scene to it. Additionally, you will be able to install the plugin called OBS Virtualcam.
If you want to use just a single scene and wish to start streaming immediately, you will need to create a new source. This will enable you to share, create, and customize your screen, game, or window while streaming to Discord for your audience. Open the Sources window, click the plus icon, and then choose one of the following three capture options:
Please remember that you can also use this section to connect your capture card for OBS as one of the source options for recording and sharing your console gaming sessions.
Virtualcam Plugin
To deliver customized details and stream OBS to Discord, it is essential to utilize the OBS VirtualCam plugin. This program allows the use of a virtual webcam without the need for a physical one.
This will enable you to create a specific scene in your OBS. With this scene, you can customize and adjust all aspects of your stream with a single click of a button. You will be able to select which webcam you want to use as the primary one and which one you wish to designate as the secondary one after you start streaming to Discord.
The OBS VirtualCam plugin must be used alongside OBS Studio. This is necessary because, without it, your Discord will not receive a signal from the OBS Studio program.
Once this virtual web camera is enabled, you will be able to set it as your primary webcam within the Discord program.
Additionally, you will be able to generate a stream that will be highly useful once your OBS scene has been created and prepared for your new stream.
Once Virtualcam is successfully installed, you can navigate to the directory where OBS Studio was previously installed. There is no need to make any changes to the program unless the location for OBS installation has changed.
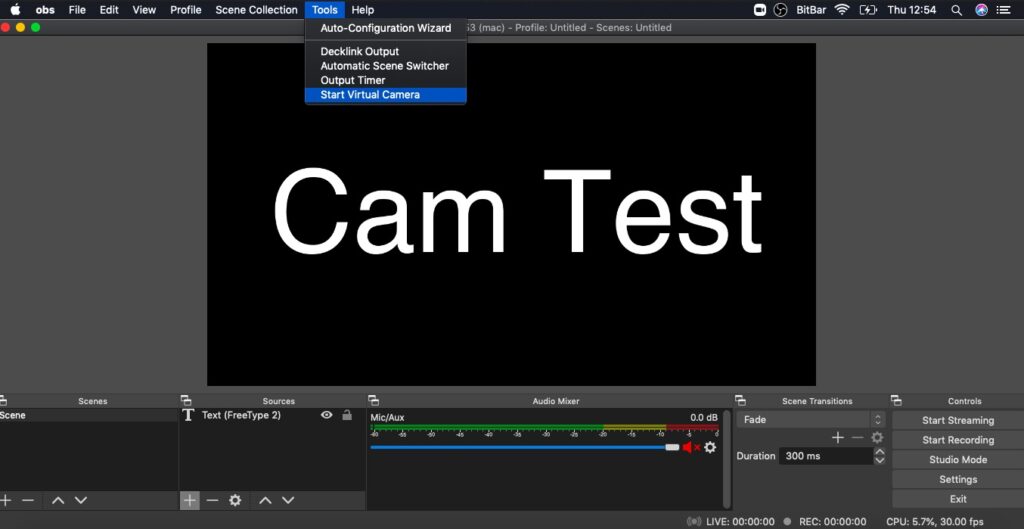
To return to OBS Studio, follow the steps outlined below:
The VirtualCam is located in the Tools menu, accessible from the top menu of the OBS Studio window. Click on it to open.
Clicking the Start prompt button will close the dialog box.
Open Discord and select the OBS-Camera as your main webcam in the voice and video settings.
Whatever happens on your OBS screen will now be instantly transmitted to the OBS VirtualCam, which you can use in Discord or any other program that supports webcams.
Adding Personalized Overlays
Incorporating an overlay or visual elements into your Discord broadcast will enhance its professionalism for your audience. The solution is straightforward and clear. While this may seem like a hassle for some, rest assured that there is a very simple method to get everything set up and running smoothly.
If you want to display various scenes in your overlay within seconds, it would be wise to try out the own3d.pro-plugin. First, you need to create a profile on the website. After that, you must link your streaming platform account.
Double-click on the own3d.the pro plugin after downloading and launching it on your PC. A popup window will appear, showing all available overlays for the offer. Install any overlay you wish by selecting it and clicking on it.
Even though all users can sample up to five free overlays, you will still need a subscription if you want to experiment with additional features, options, and overlays.
How to Configure Your Discord Stream
Discord broadcasting is an easy process that anyone can undertake. It is no more challenging than watching videos on YouTube. Anyone who has streamed on YouTube should find it simple to understand what I am about to explain.
Because the application configures itself, there are limited options for customization. Furthermore, unlike similar applications (such as YouTube), it only permits you to broadcast a specific aspect of the game you have chosen.
To start your stream on Discord, join a channel on your server and click the button labeled "Screen." This button is located in the bottom left corner, directly above your profile image, and can be clicked to begin.
After pressing the button, a popup will appear asking whether you want to broadcast a single window or your entire screen. If you choose the latter option, the prompt will be activated.
After making your selection, a window will appear allowing you to choose the quality and frame rate for the window or screen you wish to share.
We will be able to broadcast in 720p at 30 fps by default; however, if we wish to broadcast in 1080p at 60 fps, we must upgrade to the Nitro edition of our Discord account, which costs one hundred dollars per year or ten dollars per month.
If you would like to learn more about Discord Nitro options and benefits, we recommend visiting the official Discord page and exploring the site.
How To Configure Desktop Audio
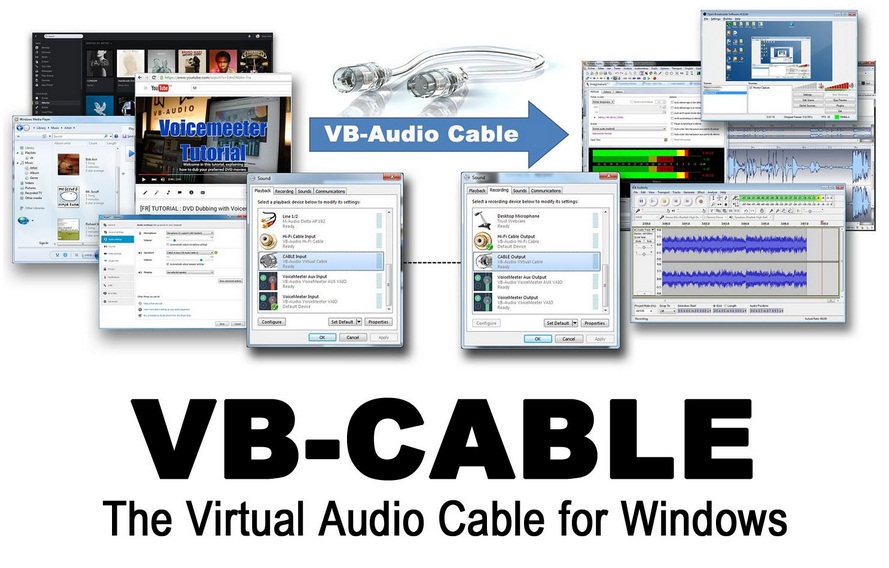
The two applications you need can both be downloaded from the VB-audio site. These applications are essential because, without them, you will not have any audio while streaming to Discord. They enable you to review options, including controls for your audio while streaming Discord, using OBS Studio.
The two applications you will need are VB-Audio Cable and Voicemeeter. VB-Audio Cable functions as a virtual audio cable, enabling you to have more audio output options without the need for additional cables in your setup.
Voicemeeter is a virtual audio application that functions as a digital I/O. It enables you to mix audio, allowing you to record Discord voice chat while screen sharing.
How to Install the Two Applications
To obtain the zip files, visit the VB-Audio web page and download them. First, locate the zip files on your PC and extract them to a location of your choice. Once you have extracted the folders, you will find the .exe files for both programs in their respective locations.
After that, all that remains is for you to install the two programs one at a time. Select the program's .exe icon from the Start menu, and then choose the location where you want to install it.
Please be patient, as the installation process will take a few minutes. It will conclude with a prompt to restart your computer, which you should accept.
Once your computer has restarted, you will need to repeat the process with Voicemeeter.
This procedure may seem time-consuming, but it is essential if you want to hear audio while sharing your presentation on screen.
How to Configure Voicemeeter and VB-Audio Cable
To start, launch the Voicemeeter application. After completing this step, you will see a window with several sliders and Tuner dials. You do not need to worry about them.
To complete the process, you must first click on number one, located in the top left corner of the Hardware Input 1 bar. From the dropdown menu that appears, select the option "MME: CABLE Output(VB-Audio Virtual)."
After completing that step, disable B and enable A next to the red vertical slider to finish the process. You have successfully navigated the hardware. From the bar on the far right of the window, select the option that corresponds to the audio output device you are using. This may vary from person to person based on individual settings.
Once you have completed all of the above steps, you must go to your PC's sound settings and select the "CABLE Input (VB-Virtual Cable)" option. By doing this, your output will be directed to the Cable software, which will convert it to input volume that you can hear through Voicemeeter.
How To Configure Discord Audio
Begin by logging into your Discord server. Navigate to your settings > Voice and Video > Output Device > VoiceMeeter Input, and enter the necessary information (VB-Audio voice).
Please avoid using cable input, as this will cause viewers on your Discord server to hear themselves while speaking to each other during screen sharing.
After that, you are essentially done with your work.
How To Stream OBS To Discord - Conclusion
A unique streaming idea like this can help you connect with your audience in ways that were previously impossible. You can customize the details to create the best possible experience for both your viewers and yourself.
If you stream to Discord using OBS, you can create content that aligns with your interests without needing to play games, conduct IRL streams, or simply produce stream clips intended for YouTube.
That being said, you now know everything you need to engage with the world on a new and unique level that is not yet widely popular or accepted. Screen share, play games, browse the web, and interact with the people who enjoy watching you.