Like users of other streaming platforms, broadcasters on Twitch engage in this activity for enjoyment and to earn money.
However, like any other job, earning money on Twitch is not always the primary focus.
Sometimes streamers aren’t in the mood to stream; at other times, they may feel down or simply be exhausted from everything.
During those moments, they require support and encouragement from their subscribers and supporters.
Support can be expressed in various ways, and one of the most effective methods is through Twitch Bits.
Table of Contents
What Are Bits on Twitch?
A Bit is a type of virtual currency that any Twitch user can buy and use for various purposes.
Nevertheless, people primarily use Bits to support Twitch streamers and gamers they admire, making it comparable to sponsorship.
That support is referred to as Cheering.
A Cheer is a chat message that utilizes Bits.
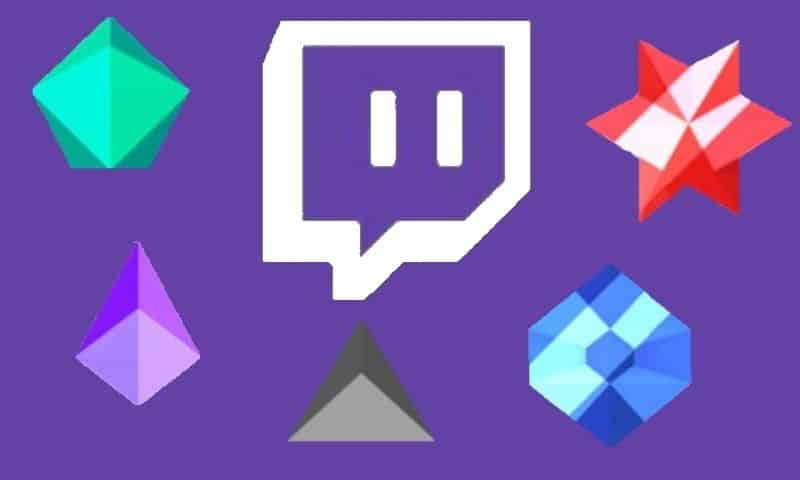
The number of Twitch Bits you use to support your favorite streamers is represented by various Bits emotes that appear in the chatbox.
You can use 1, 100, 1000, 5000, or 10000 bits to cheer someone, and the more bits you use, the cooler and more attractive animated emotes will appear in the chatbox.
By cheering with Bits, you effectively make Bit donations and demonstrate your support for an Affiliate or a Partner in the same way you would by subscribing to their channel.
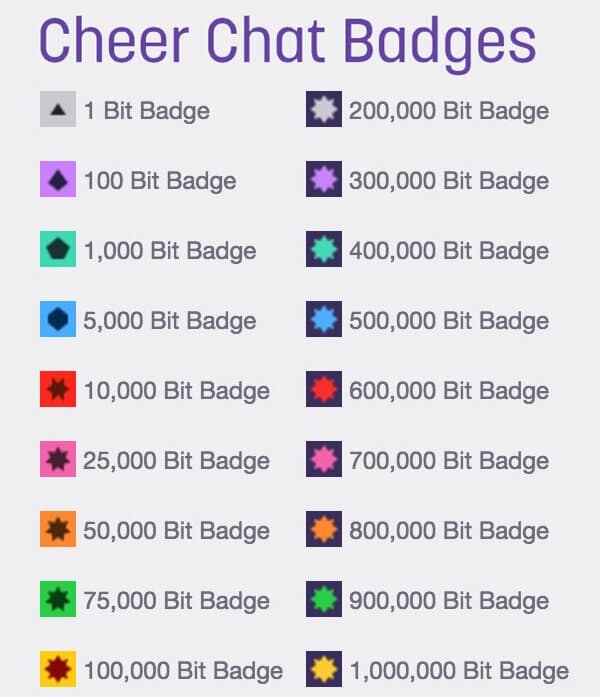
Subsequently, if you cheer for a streamer, you can eventually earn a Cheer Chat Badge, which serves as a reward for your support and loyalty.
Once you earn a Cheer Chat Badge, you cannot lose it; however, it will only be visible in the chat of the channel where you originally earned it.
Additional Uses for Bits:
Enabling Cheering and Setting Up Cheering Options

If you are a streamer, you are likely considering how to organize the Cheering action on your channel.
Let me assure you, it’s quite simple.
First of all, like any other Twitch Affiliate or Twitch Partner, Cheering will be automatically enabled for you as well.
Nevertheless, even though it is available, using Cheering is not required.
Therefore, if you wish to use it, you will need to activate it.
As previously mentioned, the activation process is quite simple, and I will now break it down for you:
Furthermore, you can organize Cheermotes and Emote Rewards on your channel by selecting the “Emotes” option in the “Viewer Rewards” section.
Thresholds
There are additional options you can configure on your channel, such as thresholds.
Firstly, you can establish the minimum number of Twitch Bits that someone can send in the chat during your Twitch stream.
Your viewers will be able to send you only emoticons that have a value equal to or greater than the threshold you set.
They will also have the option to combine smaller amounts of Bits, but their total must be at least equal to the minimum amount you previously set.
Secondly, you will have the ability to set the smallest Bit emote that can be used in your chat.
Therefore, if you set it to 10, your viewers will only be able to send Bits emotes that are worth 10 or more.
Thirdly, you can establish the minimum number of Bits required per Cheer message, thereby reducing spam in your chat.
Cheer Badges and Top Cheerers
As mentioned earlier, by using Bits emotes, users unlock Cheer Badges.
They receive a specific Badge based on the total number of Bits emotes used.
However, you can select which Badges you want to enable in your chat, and your users will be able to unlock only those Badges.
You can also create a list of your Top Cheerers (weekly, monthly, or all-time) and display it in the chat.
This approach will let your viewers know that you value their support and loyalty.
How to Buy Bits?
Bits can be purchased on the Twitch website, but remember that you must be logged into your Twitch account to complete a purchase.
There are two ways to purchase Bits: the first is by using the “Get Bits” button, and the second is by using the Bits icon located in the chat.
If you choose the first option, you will find the “Get Bits” button in the upper right corner.
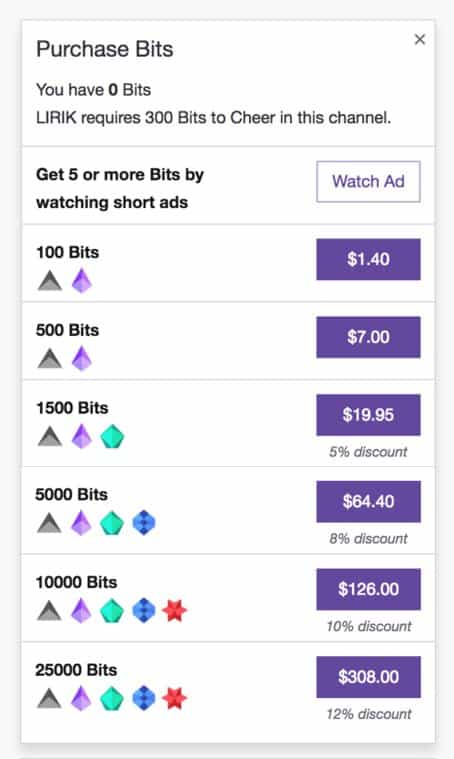
After clicking that button, select the number of Bits you wish to obtain, and then follow the additional instructions.
Conversely, if you choose to purchase Bits by using the Bits icon in the chat, the process is slightly different.
Firstly, the Bits icon is available in chats only on channels that have enabled Cheering.
After clicking the Bits icon, click “buy” and then select how many Bits you would like to purchase.

Of course, next to the number of Bits, you’ll see the price, so you’ll always know the cost of each bundle of Bits.
Next, you will be prompted to select a payment method.
Currently, there are two available payment methods: Amazon and PayPal.
The currency accepted for payment is USD.
After selecting the payment method, you will need to log in and authorize the payment.
Then simply click “Continue” and then “Pay Now,” and you will have successfully completed the purchase.
Finally, it is important to note that there are limitations on the number of Bits you can hold at any given time and on the number of Bits you can purchase each day.
Specifically, at any given time, you can hold up to 250,000 Bits, and each day, you can purchase a maximum of 50,000 Bits.
Bits Auto-Refill
Twitch provides an intriguing feature for its users: Bits Auto-refill.
If you activate this option, you will receive an automatic refill of Bits as soon as the amount of Bits you have falls below a specified threshold that you set earlier.
Importantly, to activate this option, you must have 2FA enabled on your account.
Without 2FA, you will not be able to use Auto-refill.
Now, I will explain the process of activating Auto-refill on your account.
1. Set Up Auto-Refill
First, click the “Setup Auto-refill” button, which is located on the screen that appears after you purchase Bits.
2. Bits Auto-Refill Settings
Once you click the “Setup Auto-refill” button, the “Bits Auto-refill settings” page will appear on your screen.
You need to select the threshold at which the Auto-refill will activate, as well as the amount of Bits you wish to receive with each Auto-refill.
Remember that the number of Bits you wish to receive with each Auto-refill must be equal to or greater than the Auto-refill threshold you specified earlier.
3. Payment Method
The payment methods are, of course, the same as when acquiring Cheer Bits: Amazon and PayPal.
After selecting the payment method, you simply need to authorize the payment, and the Auto-refill option will be successfully activated.
If you used, let’s say, Amazon Payments and want to switch to PayPal, you can do that as well, and it’s very easy.
Start your purchase as usual, and when you reach the confirmation screen, simply click “Change payment service.” You will then have the option to select a different payment method.
Finally, you should know that Twitch does not support the Auto-refill option on mobile devices, that you will receive an email to confirm your Auto-refill settings, and that Bits provide protection from chargebacks for the streamer.
4. Editing and Disabling Auto-Refill
If you wish to edit your Auto-refill settings, the process is quick and straightforward.
Simply navigate to your “Bits Auto-refill settings” page and select the “Edit Auto-refill” option.
Once you have made the changes, simply click the “Save changes” button.
Once more, you will receive an email to confirm your changes.
Disabling the process is just as quick and easy as the editing process.
Once again, you need to open the “Bits Auto-refill settings” page on your account and click the “Disable Auto-refill” button.
Twitch will once again notify you via email that Auto-refill has been canceled for your account.
If there are any issues with payment, Twitch will automatically disable Auto-refill and notify you via email.
Free Bits
You can obtain free Bits by completing a survey on TwitchRPG or by watching advertisements.
The number of Bits you can earn depends on the length of the survey, but you can expect to receive approximately 100-500 Cheer Bits for a survey that takes 5-10 minutes to complete.
You can also earn free Bits by watching ads on either Twitch desktop or Twitch mobile.
How to Use Bits and How to Cheer?
This is one of the most frequently asked questions regarding Bits.
Once you have purchased Bits, you are ready to Cheer and support your favorite channel.
There are two methods to launch Cheering.
The first method is to click the Bits icon in the chat, then select the emote you wish to send along with the number of Bits you want to use.
The alternative method is even simpler.
Simply type “cheer” in the chat along with the number of Bits you wish to use.

A great advantage of this method is that if you make a mistake, you can quickly correct it.
Specifically, after you type “cheer” followed by a number (for example, cheer100), and press enter, the message is sent only after a delay of 5 seconds.
If you enter an incorrect number of Bits (for instance, 1000 instead of 100), you have 5 seconds to click the “Cancel” button that will appear on the screen to correct your mistake.
Remember that the word “cheer” and the number should be written without any spaces.
After that, you can either type a message to add or simply send your Cheer.
The message will appear very cool, as each amount of Bits is represented by an intriguing animated emote.
Last but not least, this action also comes with its limitations.
Specifically, you can send up to 10,000 Bits per emote and 100,000 Bits per message.
Anonymous and Mobile Cheering
A very intriguing option provided by Twitch to its users is the so-called “anonymous Cheering.”
If you wish to cheer anonymously, simply select the “Cheer Anonymously” option on the Cheer card.
A special Anonymous Cheer Cheermote appears in the chatbox when someone Cheers anonymously, and a ghost badge will appear next to the Cheer.
This ghost badge cannot be earned and is exclusively reserved for Anonymous Cheerers.
Additionally, Anonymous Cheers cannot include any messages and do not impact Bits Badges or Top Cheerer Leaderboards.
Cheering on mobile devices operates in a manner quite similar to regular web Cheering.
Once you have entered the chat, simply click the Bits icon, select the amount of Bits, and type the message you wish to send.
To purchase Bits using your mobile phone, click the Bits icon and then select “Get Bits.”
After that, the process becomes very simple and straightforward.
Before purchasing Bits via your mobile phone, it’s important to know that the payment is processed through either the Apple App Store or Google Play Store, which may result in additional fees.
Therefore, please remember that if you purchase Bits through the Twitch mobile app, you will pay more.
However, there is an option to purchase Bits on your mobile device, but at standard prices.
To do this, open your mobile web browser and navigate to bits.twitch.tv.
Additional Information
All users should be aware that their comments and Cheers may be deleted, and Cheerers can be banned or timed out by the channel moderator.
If overlays are used, the overlay provider may enable the broadcaster to delete Cheer messages.
Those Cheerers will no longer be able to Cheer or use Bits on that channel.
Most importantly, Bits spent on a deleted comment will not be returned to the user.
I advise you to be polite and avoid writing anything inappropriate. If you do, your comment will not be visible, you will be unable to post comments on that channel again, and you will lose your Bits.
Conclusion
From our perspective, Bits and Cheering are intriguing elements that certainly enhance the experience of using Twitch.
If you had any doubts or dilemmas regarding this issue, we hope we have resolved them.
For those who have just learned about this option, we hope to have presented you with another way to support the streamers you enjoy.
We hope you find this text useful and that it enhances your enjoyment of Twitch.
