Top Twitch streamers understand the significance of a Twitch overlay, Twitch panels, and other graphics, and they invest considerable effort into creating them. Therefore, it’s essential to learn how to create a Twitch overlay using Photoshop.
Photoshop Guidelines on Twitch Overlays
* Dimensions – same as your resolution, for most it is 1920x1080p and 750×250 for alerts;
* Background – transparent or specific image;
* Elements – plan which elements you want to add;
* Design – match the overlay design with the game you’re playing;
* Opacity – overlay bar opacity to 75%
Creating a Custom Twitch Overlay
1. In Photoshop, click File > Create a New Image;
2. Input image dimensions;
3. Add a game screenshot to help you choose overlay colors;
4. Add top banner;
5. Insert social media logos from Icon Finder;
6. Add a channel logo if you have one;
7. Create and add a bottom banner;
8. Insert webcam frame;
9. Choose a font and insert text layers;
10. Remove the background you inserted before;
11. Save the file as a Photoshop document for future editing;
12. Now, save the file as PNG;
13. Add the PNG file to your streaming software;
Adding Twitch Overlay to OBS
* Create a new scene in OBS;
* Create a new source;
* Choose “image” as the source type;
* Click “Create new” and name it somehow;
* Press “Browse”, find the overlay file on your PC, and click “Ok”;
In this article, I will discuss how to use Photoshop to create a Twitch overlay that stands out and helps you attract more viewers.
Table of Contents
What is a Twitch Overlay?
First, let’s familiarize ourselves with the basics.
To create a Twitch overlay, you first need to understand what it is.
A Twitch overlay is an image shown during a live stream, designed to enhance the stream and emphasize important elements through an appropriate color scheme.
The number of elements is entirely your choice. Here are some suggestions for what you can include:
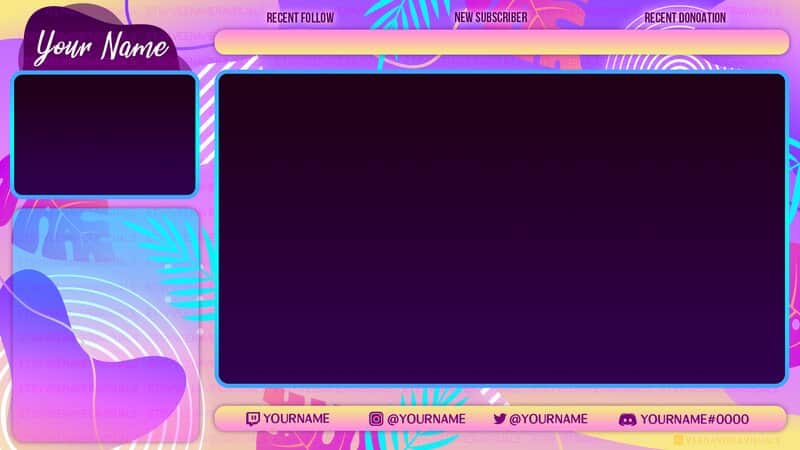
Webcam Overlay
Viewers are not only interested in the gameplay but also in your reactions.
However, a simple box on the screen won’t capture their attention, as the gameplay is far more engaging.
That is why you should include a webcam overlay, which will capture the viewers’ attention, allowing them to engage with both you and the gameplay.
Ad Overlay
Your paycheck relies on sponsors. To retain them, viewers must click on the affiliate links provided.
By adding an ad overlay, you can capture their attention for the product or program you are promoting, boost the number of clicks, and secure future collaborations with brands.
Chat Overlay
Chat overlay is positioned around the chatbox; by emphasizing this element, you encourage people to participate in the discussion and ask you questions.
Alert Overlay
Alerts are utilized to welcome new followers, subscribers, and donations. Whenever a viewer takes action, a notification will appear on the screen.
How to Create a Twitch Overlay with Photoshop – Guidelines
Creating an overlay in Photoshop can be somewhat challenging, as the program necessitates photo-editing skills.
However, if you don’t possess them, you can still create a Twitch overlay by following the guidelines.
If, after reading, you feel that you are not up to the task, you can always seek a skilled designer in the Fiverr Twitch section.
Dimensions
Twitch has specific requirements regarding image dimensions.
When adding one, you must ensure that it meets the dimensional requirements.
The suggested overlay size is 1920 x 1080 pixels, which likely corresponds to your screen resolution.
Alerts should be smaller; appropriate dimensions are 750 x 250.
Background
Another aspect to consider is a transparent background.
Otherwise, when you place the image over the live stream, viewers will not see the gameplay. Later, I will discuss how to make the background transparent in Photoshop.
Elements
Before you begin designing in Photoshop, make a list of the elements you wish to include.
Then, the process of creating an overlay will be significantly easier.
Aligning the Design with the Game
The overlay should enhance the viewer’s experience, not hinder it.
When selecting the overlay design and size, ensure it aligns with the game’s theme, enhances the dynamics, and allows for sufficient screen space.
Opacity
One aspect of the game will be obscured by an overlay regardless of your actions.
There is a trick to make the transition from an overlay to a game smoother: set the overlay bar opacity to 75%. This way, the game will be more visible through the overlay.
How to Create a Custom Twitch Overlay
Photoshop is among the top programs for creating overlays and other Twitch graphics, thanks to its extensive tools and options.
You begin with a blank canvas, offering you endless possibilities, unlike overlay templates, where you must adapt your idea to fit the provided theme.
This section will discuss how to create a Twitch overlay, even with minimal knowledge of Photoshop and design.
Canvas
First, open Photoshop on your computer.
To create a Twitch overlay from scratch, click on “File” and select “New Image.”
Photoshop will prompt you to enter the image size. Keep in mind that the recommended dimensions for a Twitch overlay are 1920 x 1080 pixels.
Add a Game Screenshot
The advantage of custom overlays is that you have total control to design a Twitch overlay that perfectly aligns with the game’s theme.
To ensure your design aligns with the theme, it is beneficial to add a game screenshot into Photoshop and use it as a reference when selecting colors.
Insert the screenshot by selecting “File and Place.” Then choose the file and adjust the image to fit the blank canvas.
Add a Top Banner
The top banner is the initial element you should incorporate into your design.
Each element should be placed in a new layer. Before adding the top bar, select New Layer and rename it to correspond with the element’s name.
Find the rectangle tool in the left side menu, then select Color Selector. Choose the color for the top bar.
Drag the new element onto the uploaded layer.
To create borders, right-click on the layer for this element and select “Blending Options” from the drop-down menu, then choose “Stroke.” Experiment with different options and use the gradient tool to find the one that best suits your Twitch Stream overlay.
Once you are finished, tap OK and select the layer again. Press the letter V on the keyboard to activate the move tool, and then move the banner upwards to position it.
In the final step, set the opacity to 75%. If this appears too transparent, you can select a lower value.
Add Social Media Logos
The top banner is primarily used to display social media accounts, so you will now learn how to position these logos at the top.
For social media, you will need to find pre-made logos. Ensure that you use those that are free for public use to avoid legal issues. One of the best apps for this is Icon Finder.
These images are also added using the “File and Place” feature, but first, create a new layer for all logos.
Next, drag this layer above the top bar layer.
Ensure that you adjust the Stroke in “Blending options” to match the Stroke of the top bar layer.
Each logo must be added individually, and once you have completed this, you should position them in the right and left corners of the top bar.
Add a Channel Logo
The Channel logo is usually positioned in the center of the top bar, making it the first thing viewers notice when they enter the live stream. If you do not have a logo, you can showcase the key information about your Twitch channel.
Begin by selecting the ruler located on the left toolbar. This tool will assist you in positioning the logo when you add it to Photoshop.
Add the image and check if it works. If it doesn’t, you can use the ruler to position it manually.
Now, click on the rectangle tool and create a rectangle that is slightly larger than the logo. Add an outer stroke that matches the border.
If the new rectangle is positioned above the logo, move its layer in the layers box below the logo layer.
Select the two layers in the layer menu, hold down the Ctrl key on your keyboard, and drag both overlay elements to position them.
Add a Bottom Banner
One of the most crucial steps in creating overlays is adding the bottom bar.
This element can serve not only as a border but also for highlighting specific actions.
Now that the upper banners are created, making the bottom banners is even simpler.
Since a single bottom bar can obscure a significant portion of the game screen, it is advisable to create two separate bottom banners—one on the left and one on the right.
Begin by right-clicking on the layer for the top bar and selecting “Duplicate Layer.” Next, activate the Move Tool to position the new element in the bottom left corner. Use the Duplicate Layer tool once more to create a layer for the bottom right corner.
Now, the borders of the Twitch overlay are the same color.
Add a Camera Frame
The camera frame is the final element you need to create in Photoshop. Add a new layer and name it Camera Box or Frame.
Once again, begin with the rectangle tool to draw a perfect square.
Now, select the layer, right-click on it, choose Blending Options, and then select Stroke.
Locate “Position,” and select Inside from the drop-down menu.
When selecting colors, choose those that align with the theme of the Twitch overlay and the game.
Next, return to the Camera layer and set the Fill color value to 0%.
By holding Shift and V, you can position the element while maintaining the original aspect ratio.
Add Text
Once you add text, you have completed the design of the Twitch overlay.
Begin by creating a new layer named the text layer.
Next, use the Text tool to create a text box anywhere on the screen.
On the right side, you will find the Character menu—select the font and color of the text.
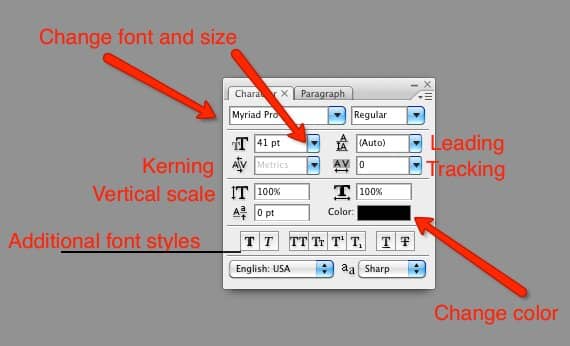
If you cannot find this menu in the Photoshop layout, click on Window and select Character.
Once you have selected the text style, type it in and move it to the bottom bar by activating the Move tool or by holding V on your keyboard.
Depending on your design, it may appear somewhat dull in comparison to the right side of the Twitch overlay.
This can be enhanced by selecting the appropriate layer in the layers box and opening the Blending options.
All tools are located in the Stroke and Drop Shadow tab.
There are no specific guidelines for which options to set in this tab. You will need to experiment with them to determine which will enhance the visual appeal of your Twitch overlay.
When you want to add another text box, be sure to create a new layer. You can expedite the process by duplicating layers.
Removing the Background
Before saving your new Twitch overlay, be sure to remove the background.
Simply navigate to the layer containing the screenshot and the background layer, then click on the eye icon.
Now, only the overlay elements should be displayed.
Save Your Twitch Overlay
You may want to edit this overlay to match another game as well.
The file can only be modified when it is saved as a Photoshop document.
Once you have this file, save it in PNG format to incorporate it into the broadcasting software and Twitch.
How to Add a Twitch Overlay to OBS
Adding Twitch Overlays to OBS or any other streaming software is very simple. Just follow these steps:
Final Thoughts
As you can see, creating Twitch overlays with Photoshop is quite simple, even if you lack photo-editing skills.
I hope this article has assisted you in creating fun and original graphics for your Twitch channel.
Enjoy yourself!
FAQ
How do I make an overlay in Photoshop?
Firstly, list the elements:u003cbru003eu003cbru003e- Top bar u003cbru003e- Bottom bar u003cbru003e- Camera box u003cbru003e- Logos (for social media and channel)u003cbru003eu003cbru003eThen launch Photoshop and start from the screenshot. It will be the first of two background layers. Then create a white background using the Rectangle tool. Now you can add elements. Remember that every element should be made in a separate layer. Once you create the top bar, tap on the New layer to create the bottom one.
How do I make my own Twitch overlay?
Twitch overlays can be made in several programs. The common ones are Canva and Placeit. u003ca href=u0022https://link.xsolla.com/HM24US7Iu0022 target=u0022_blanku0022 rel=u0022noreferrer noopeneru0022u003eOWN3Du003c/au003e and u003ca href=u0022https://nerdordie.com/shop/ref/Mitrovic/?campaign=Streammentoru0022 target=u0022_blanku0022 rel=u0022noreferrer noopeneru0022u003eNerd or Dieu003c/au003e have a large gallery of Twitch templates. Once you choose a template, you can modify it, so it matches your brand.
What size Photoshop for Twitch overlay?
The size of all Twitch overlays is the same – 1920 x 1080 pixels. Typically, alerts are smaller in size, as they are only graphical images that show up a few times during the stream.
