Streamlabs is an excellent streaming software due to its versatility; however, if you are a beginner, you may feel uncertain about how to use it effectively.
Fortunately, you’ve come across this article, where I will discuss various aspects of streaming with Streamlabs OBS.
If you are just starting and need assistance with the setup process, then continue reading!
This time, I will discuss the best Streamlabs OBS settings! Let’s start this quick guide on this streaming platform!
Streamlabs OBS Best Settings
To have the best possible stream, adjust these 4 options in OBS settings:
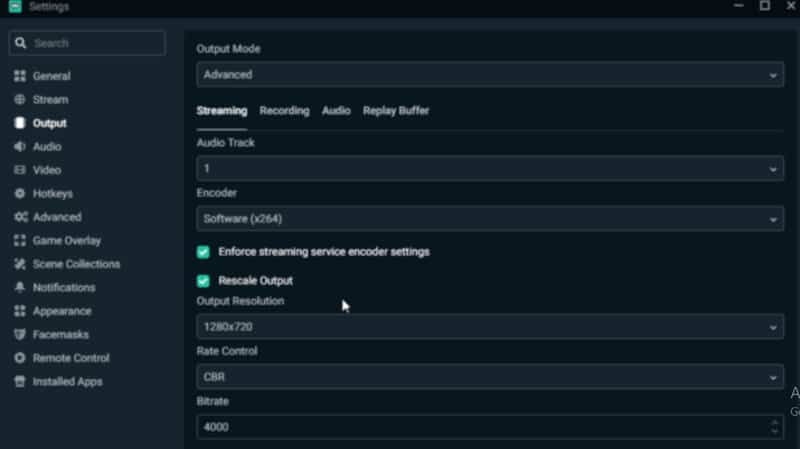
1. Encoder (choose NVENC encoding, so your PC uses a graphic card for the encoding).
2. Preset (pick “Very fast” so your CPU isn’t used too much).
3. Resolution (preferable output resolution is 1080p if you have hardware strong enough. If not, stick to 720p).
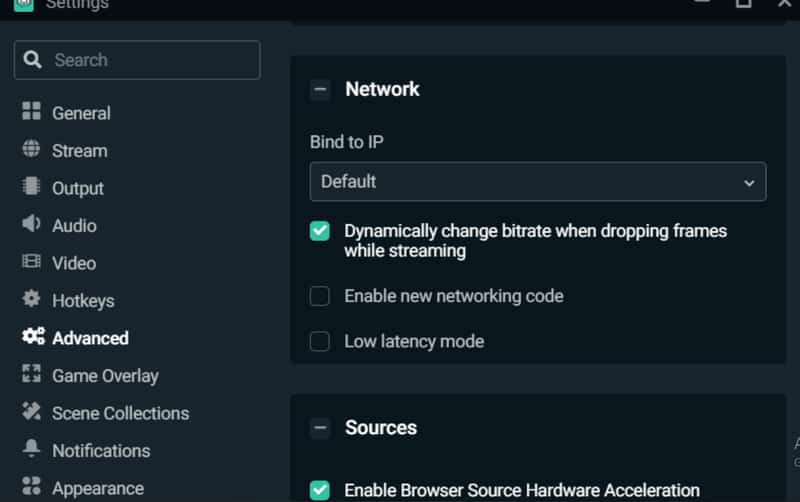
4. Bitrate (go to Advanced settings and enable Dynamic bitrate to prevent lag caused by unstable internet connection).
Further explanations and an FAQ section can be found in the text below.
Choosing incorrect settings can disrupt the stream.
You’ve likely heard about issues with dropped frames or skipped frames.
Many streamers also express concerns about the video or audio quality, which are often caused by settings that are not suitable for your CPU, GPU, internet connection, and other equipment.
Choosing the right settings can be challenging, but fortunately, I’m here to guide you on how to configure the appropriate Streamlabs OBS settings for Twitch.
Table of Contents
Streamlabs Encoder Settings
There are two settings for the encoder, which you will find in the Output mode window.
By default, Streamlabs selects Software encoding or x264. Therefore, I will first discuss this setting.

1. X264 Encoder
As mentioned, this encoder relies on software, resulting in slightly higher CPU usage, which prevents it from being among the best Streamlabs OBS encoder settings.
If the CPU is overloaded, various problems can arise during live streams; therefore, you should switch to a GPU if possible.
2. NVENC Encoding
If you select NVENC, SLOBS will utilize hardware encoding and the GPU rather than the CPU.
So, why is this setting superior?
Firstly, there will be no lags, as CPU usage will not be as high.
This ensures that the entire stream operates smoothly, which is the most important aspect.
One thing to keep in mind is that the quality may be slightly lower, but you can improve it by adjusting the bitrate.
If you have an NVidia graphics card, always choose hardware encoding.
Preset
When discussing Streamlabs OBS output mode settings, it is important to mention the preset as well.
This will affect the speed of the encoding process.
If the process is quick, the CPU is utilized less, so I recommend selecting “Very fast” – the video quality will remain the same, and the CPU will continue to function properly.
Preferred Resolution
The stream quality is heavily influenced by the selected video resolution.
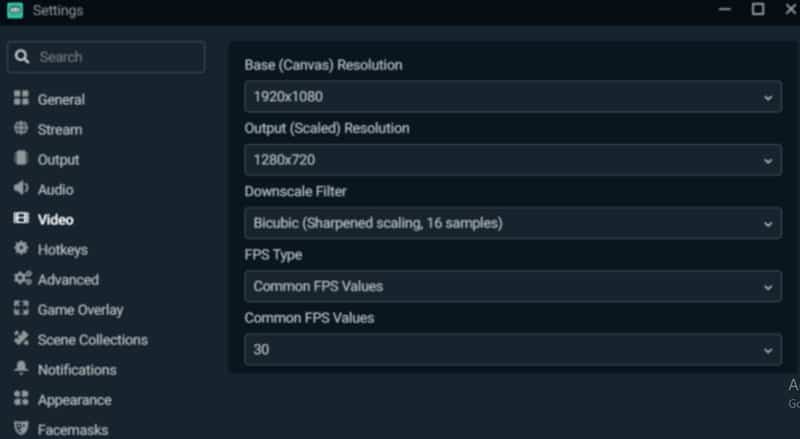
When you open the Video windows, you will observe two different resolutions.

Base resolution is the initial one.
By default, this is set to 1080p, which is likely the same resolution as your screen, so you may not need to change anything.
The Output resolution will need some additional attention.
Live streaming in 1080p is preferred because it doubles the number of pixels, resulting in improved overall image quality.
However, this resolution is too high for most streamers, forcing them to switch to 720p.
With the lower resolution, you will still achieve decent image quality while using less CPU power.
Optimal Streamlabs Bitrate
For beginners who may not know what bitrate is, it refers to the number of bits per second, which determines the quality of both desktop audio and video settings.
So, which bitrate is best for Streamlabs OBS?
First, you need to visit speedtest.net to check your internet speed parameters.
Focus on the upload speed, as it will determine the bitrate. Always select a bitrate that is close to the upload speed, ensuring it is slightly lower.
If you prefer not to adjust this setting manually, you don’t have to.
SLOBS can automatically determine the optimal bitrate and adjust this setting accordingly.
However, there is one aspect you will need to handle independently.
I previously mentioned dropped frames; these occur due to inconsistent or unstable internet connections.
If the bitrate is fixed, you can anticipate that your screen will drop frames during the live stream.
That is why I recommend going to Advanced settings and enabling Dynamic bitrate.

Now, even when the internet connection is unstable, the stream will continue to run smoothly, and you won’t have to worry about dropped frames.
Conclusion to Best Streamlabs OBS Settings
At the end of this Streamlabs OBS guide, I want to emphasize that the best streaming settings for OBS vary for each streamer.
After you have finished adjusting the main settings, conduct a brief test to ensure that everything is functioning correctly.
Additionally, while you are here, please read the FAQ below!
Frequently Asked Questions
What is the recommended bitrate for SLOBS?
The recommended value is 4000 kbps. Anything between 3500 and 5000 kbps should also work fine, and always enable dynamic bitrate.
If I choose 1080p and 60 FPS, which bitrate should I set?
With that resolution and FPS, the ideal bitrate is between 4500 and 9000 kbps. 9000 kbps is probably too high, but if you have a powerful computer, give it a try!
Do you need a capture card to stream on Streamlabs?
This depends on the device you are using for streaming. If you plan on using the computer, you probably do not need the u003ca href=u0022https://streammentor.com/best-capture-card-for-obs/u0022 target=u0022_blanku0022 rel=u0022noreferrer noopeneru0022u003ecapture card for OBSu003c/au003e. However, console streamers have to use one.
