To become a streamer, all you need to do is turn on a camera and record a game. However, if you aim to build a brand, you will need to invest more effort.
With overlays, your videos and live streams will stand out among others. So, how to add overlays to OBS?
1. Create or choose the scenes you need;
2. Add image source by clicking “+” in the Source tab
3. Name the new source;
4. Upload an overlay from your PC
5. Edit overlay settings by right-clicking on the overlay source and then going to the “Transform > Edit Tranfsorm”
At first, it may seem a bit tricky, but don't worry - here is a step-by-step guide on adding overlays to OBS.
Twitch panels and overlays can greatly enhance the quality of your content. They can serve as transitions between different scenes, and the process of using an overlay in OBS for transitions will be explained later.
Now, let’s concentrate on the essential scenes for every live stream.
You can stream without them, but incorporating this system will provide you with greater versatility, and your content will appear more professional.
1. Primary Scene
The primary scene refers to your main content, or in other words, the game you have chosen to stream.
It has the most sources. First, you need to add either game capture or display capture.
If neither option works, capture only one of the active windows using Window capture.
Next, identify the source of audio and the video capture device. This is important for streamers using webcams or standard cameras for live streaming, as well as a capture card for OBS.
The final source is an overlay.
2. The Separate Scene for Audio Devices
OBS automatically captures the audio from your desktop, and you can also connect a microphone to record this sound.
In certain areas, the audio from the microphone must be louder than the background sounds, while in others, microphone audio is entirely unnecessary.
Controlling audio will be easier if you add it as a scene.
As the scene changes, you can adjust the tones and apply the same settings for any future live streams.
3. Overlay Scene
There are several benefits to adding overlays as separate scenes:
4. Starting and Ending Scene
These scenes, particularly the opening one, are equally important as the main scene.
What is a starting scene?
It can be as simple as an image with the caption "Starting soon". The most popular starting scene is a countdown timer.
With this scene, you can promote your stream effectively—viewers will know when to join, and you can include a brief description of the stream (such as the game you plan to play, which level, etc.).
Additionally, encourage viewers to begin chatting before the stream starts. Provide a specific topic or organize a brief Q&A in the chat.
If you have a close relationship with a few viewers or other streamers, consider sending personal invitations.
The ending scene can be much simpler than the opening one. You can simply thank your audience for watching, participating, and/or donating.
5. AFK and BRB Scene
This scene typically features animations accompanied by relaxing music.
Typically, streamers utilize videos from their past streams for these scenes.
Simply collect some of the best scenes from any previous broadcast and edit them to create a loop.
Show video during breaks, between two live streams.
6. Sponsorships
Adding a scene for sponsorships is very easy—these scenes are quite straightforward.
If any of the live streams are sponsored, upload a picture along with a brief statement at the start of the stream.
Additionally, pre-record audio playback of the same statement and play the audio every thirty minutes.
Another option is to include an affiliate link in any scene.
7. Scene for Highlights
This resembles the BRB scene.
You can choose to display the highlights from one or all previous streams.
Utilize this scene to connect with your audience—ask them which parts of the stream they enjoyed the most, include those videos, and express gratitude to those who voted.
Additionally, remember to include important links (such as social media, affiliate links, or Patreon) at the end of this scene.
Adding overlays is a simple process, particularly once you understand how OBS functions.
Open your OBS so we can get started!
1. Select the scene
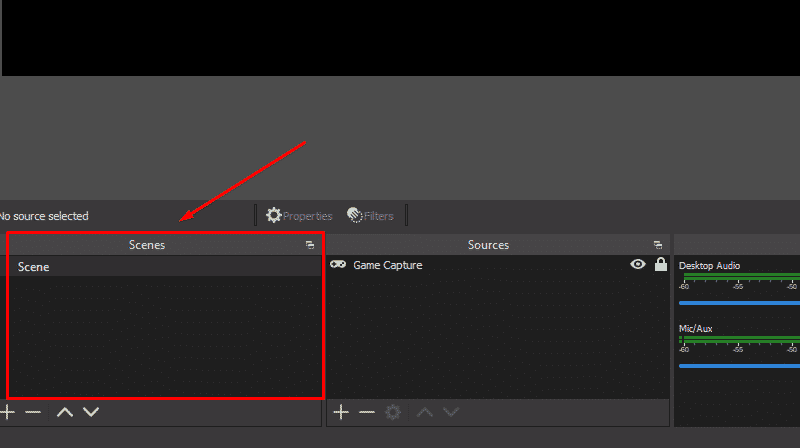
Before adding any overlays, ensure that you have already included all the necessary scenes.
You can add the scene by clicking the "+" icon in the top left corner of the Scene box.
Next, select one of the scenes by left-clicking on it and wait for the blue screen to confirm that you’ve chosen the correct one.
2. Add Overlay to OBS
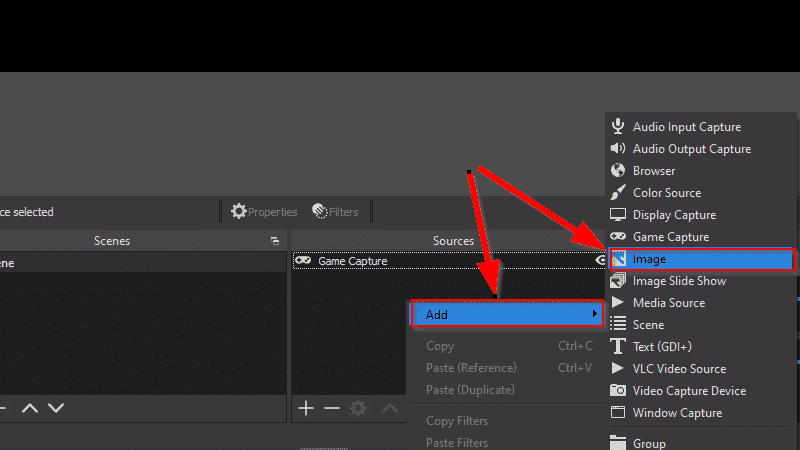
After selecting the scene, navigate to the Sources box located next to the Scenes tab.
Right-click in this tab and select Add. As you can see, multiple items can be added, and you should look for the option for Image.
You can also add an image to the Sources tab by using the "+" icon.
3. Name the New Source
After finishing the selection of the Image option, another window will pop up.
From there, you can create a new source by selecting “Create new.” Alternatively, you can use one of the sources you added previously by simply checking “Add Existing.”
In this case, choose the first option - Create New.
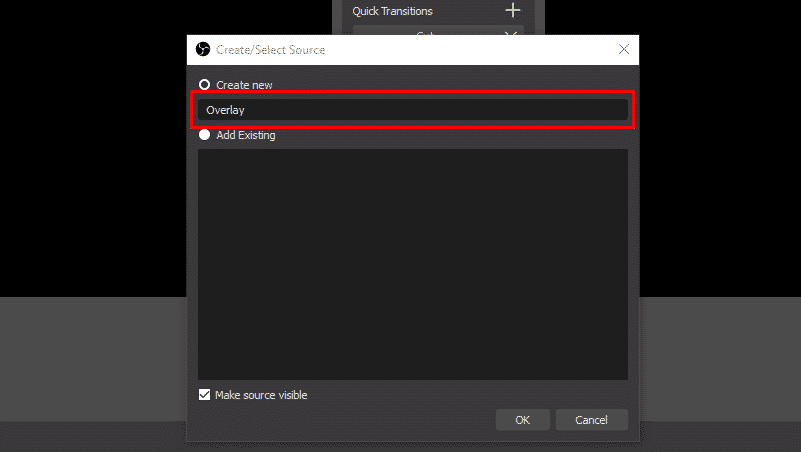
Now, name the source—choose a straightforward name that describes the source. When you are finished, click OK.
4. Upload an Overlay
In the Properties tab, you can upload overlays.
As mentioned, they can include anything—images, videos, text, and streamers also use their webcams as overlays.
Click on Browse to locate the overlay on your computer.
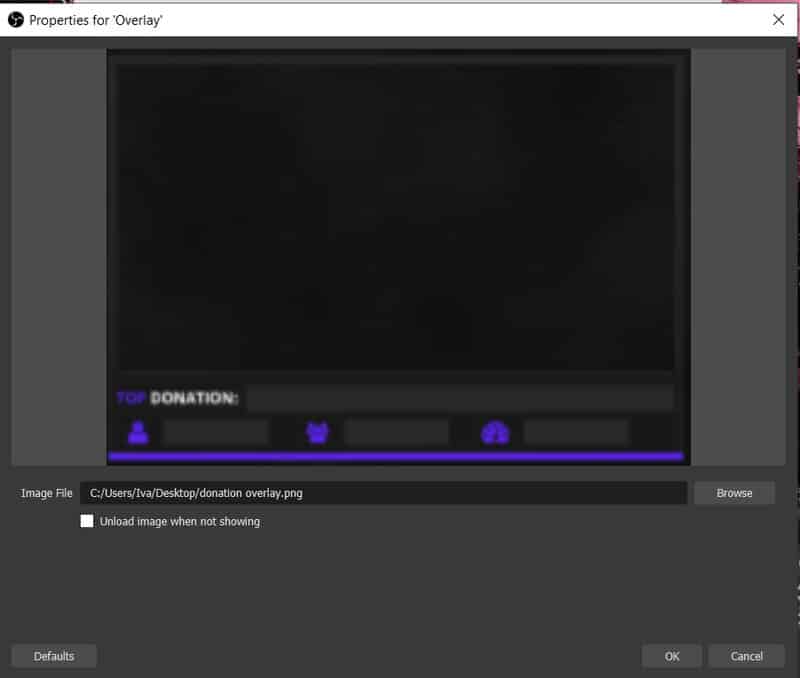
Ensure that you can see the preview of the overlay, and then click the OK button.
5. Adjustments
OBS determines both the size and position of the image.
Once it is added, you will need to adjust these settings.
Locate the overlay in the Sources tab, then right-click on it to open the Options tab.
Select Transform to modify these default settings.
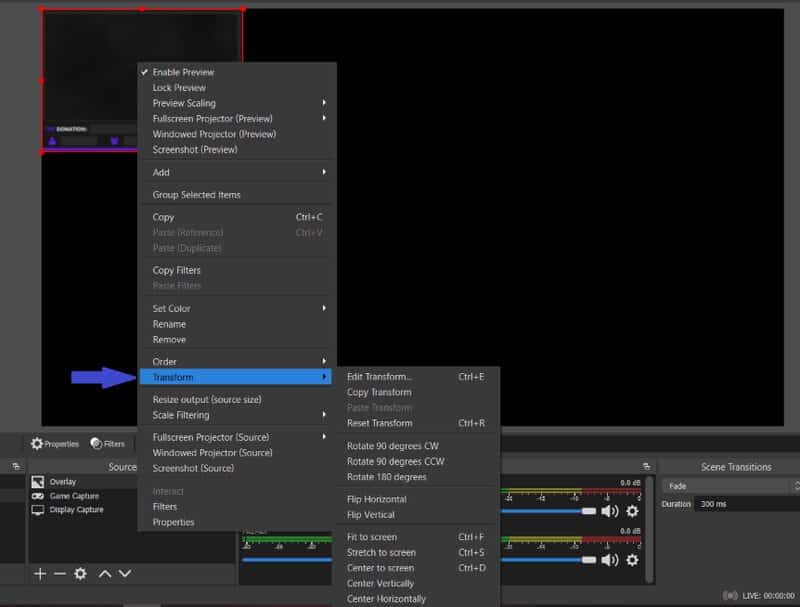
A preview window will open. Move it around the screen until you find the optimal position. Then, click on one of the dots on the image and drag it to adjust the size.
You can resize the picture without opening the Options tab—just left-click on the overlay and hold the shift key.
Images can also be cropped; simply left-click on the image and hold the alt key.
If you have completed all the steps mentioned above but still cannot see your overlay, what should you do?
Don't worry - the solution is straightforward.
Examine your Sources tab.
Think of each source as a distinct layer - the source at the top conceals all the sources below it.
If the source for Game or Display capture is positioned above the Image source, you won’t be able to see your overlay.
Simply drag this image source above all other sources.
You should also pay attention to full-screen sources, as they will conceal everything else on the screen. Therefore, never position them on top of other sources.
Related: Best OBS Settings for Twitch (2021)
All transitions are performed using Hotkeys. If you haven't learned how to use them yet, now is the time!
Before opening the Hotkeys tab, ensure that all scenes have been added.
Next, navigate to Settings and open Hotkeys; all the scenes should be displayed.
Directly beneath the Scene number and name, you will find “Switch to scene”.
Press “ctrl+alt+1” - this shortcut is specific to OBS and will not work in other programs.
Using hotkeys, you can add additional commands. For instance, with one of the combinations, you can hide an overlay.
Frequently Asked Questions
Can I make my own Twitch overlay?
What makes a good Twitch overlay?
How do you add a camera overlay to OBS?
Next, click on "+" in the Sources tab again, and this time choose "Video capture device." The video from your webcam should appear on the screen, so adjust the settings and click OK.
Now resize the video window to match the dimensions of the overlay, and position it within the overlay. In the sources, ensure that you move the overlay source above the webcam source.