Streamlabs OBS Studio is a free streaming application that can greatly improve the quality of your stream, regardless of the platform you are using. If you are just starting with streaming and are unsure which software to choose, here is a comprehensive guide on how to set up Streamlabs.
Table of Contents
How to Use Streamlabs OBS
Using Streamlabs OBS can be challenging at first, despite its intuitive design, primarily because of the multitude of options presented to users at once.
That said, you can greatly benefit from using all these features, as long as you know how to do so. Here are some of the most important ones:
1. Download and Install Streamlabs
Streamlabs OBS is available on their website, which is quite easy to access. Use your browser to visit the webpage and download the app.
From there, you will be guided to install it in just a few simple steps. Once that is complete, you can run the app and connect it to your streaming platform profile.
2. Import OBS Profile
After you have downloaded and installed the Streamlabs OBS app, you will be prompted to import a previously created OBS Studio profile.
While this option can be quite valuable for someone who has previously used OBS and is simply switching to a new device, accepting this prompt is not mandatory.
If you don’t have a previously set profile, or if you do but wish to start anew, skip this step and proceed to the next one.
3. Add Scenes and Sources
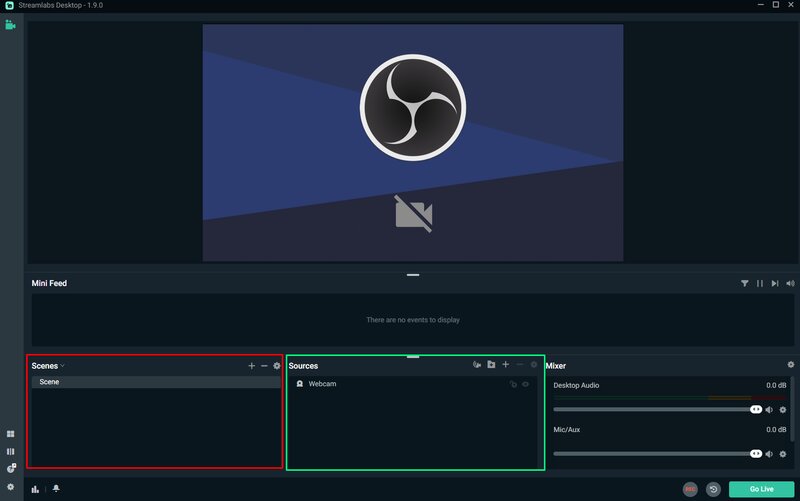
Scenes and sources are the foundation of your SLOBS stream. A source refers to the origin of what appears on your screen, such as a microphone, webcam, browser, and more. These sources are displayed in the Sources tab.
To add a new source, click the “+” icon in the sources tab. Then, select the category to which your new source belongs.
Some sources offer additional settings for you to adjust while adding the source itself. Clicking on Done will add the source.
Finally, you can adjust the size of each source on your screen to ensure they all fit neatly.
There is also a simpler option for those who prefer not to adjust each source manually, known as Scenes. Scenes are a precompiled set of sources that you can activate to automatically configure the appearance of your video stream.
Streamlabs OBS offers many free-to-use scenes at all times, with additional premium options available.
4. Adjust Quality and Resolution
The next step after adding sources is to adjust your stream’s visual quality and overall screen resolution. The resolution you choose will most likely depend on your screen, while other video settings will be determined by your hardware’s overall power.
This can be accomplished through the video tab in the settings of the Streamlabs OBS desktop app, which appears as follows:
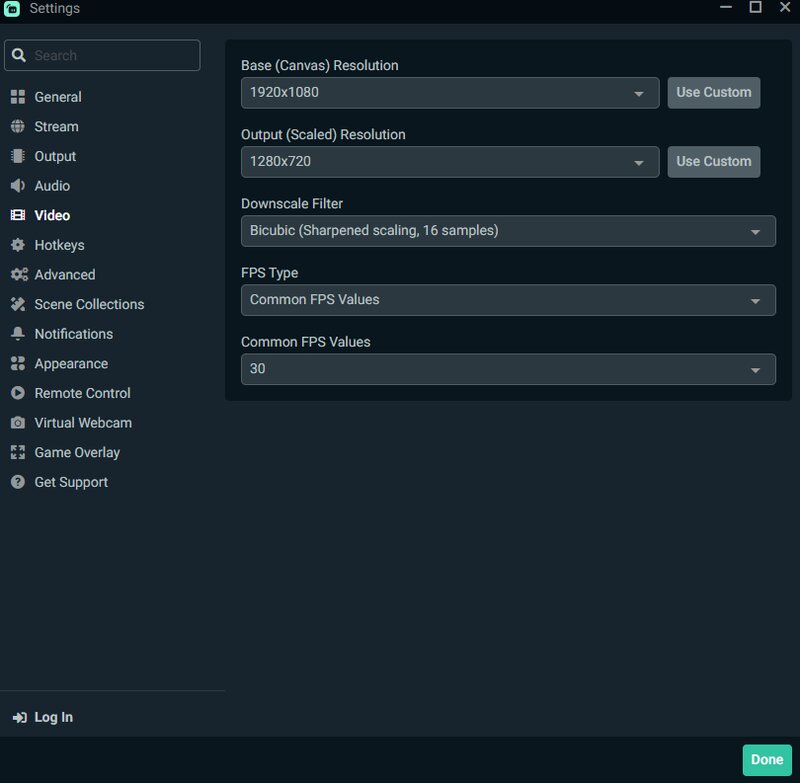
The base resolution should match your screen’s, while you have more flexibility in adjusting the other settings. A good rule of thumb is to reduce the output until you are sure your CPU can manage it, as glitches can greatly detract from the quality of your stream.
5. Choose the Encoder
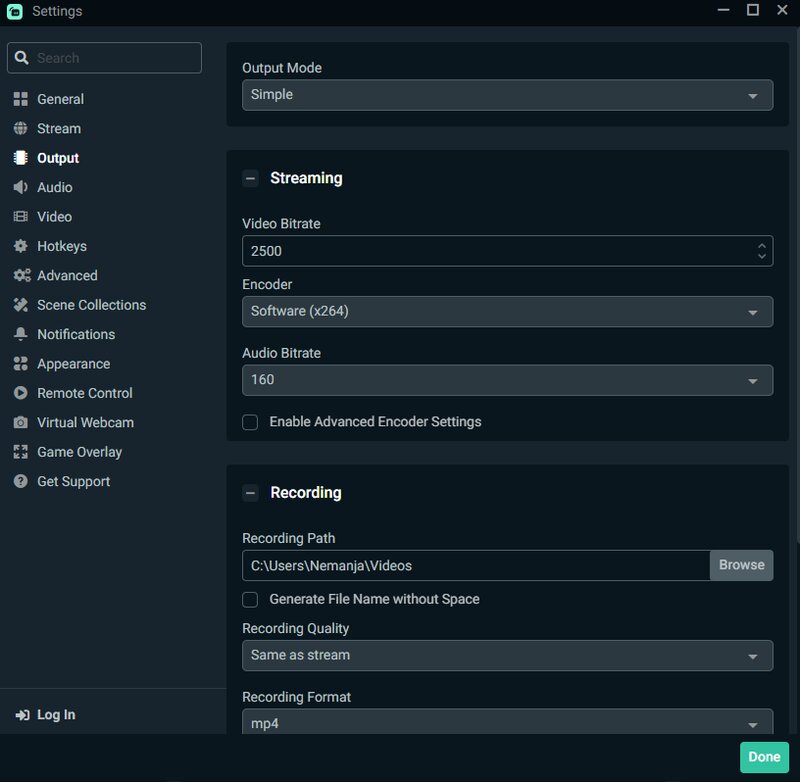
After completing the video settings, proceed to the output tab to select how your PC will encode the video. There are two options available: software that utilizes your CPU and hardware that relies on your GPU.
Your choice will depend on the relative strength of the two components, and you should ensure that you do not compromise your game performance by allocating too many resources to the encoder.
6. Adjust the CPU Usage
Another important step to ensure good game performance is to optimize your CPU usage as much as possible.
To accomplish this, remain in the output tab and scroll down until you locate a drop-down menu labeled “Preset.” To enhance performance, adjust this menu to Quality.
7. Set the Bitrate
After configuring the CPU usage, you should navigate to the advanced settings tab to set the bitrate that the OBS software will utilize.
You can select a Dynamic bitrate, which enables the app to determine the best bitrate for Streamlabs. The primary advantage of this feature is that your PC understands its capabilities, ensuring you won’t experience lag, even when streaming on a budget machine.
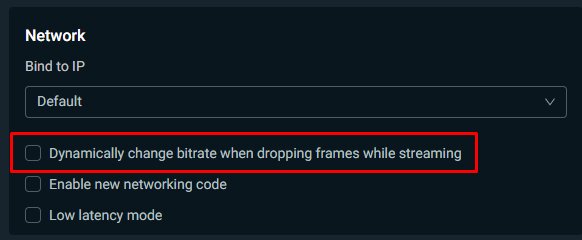
Alternatively, you can manually set your bitrate to any value you prefer, but once again, ensure that your PC can handle it. That said, for very powerful configurations, a manually set bitrate can utilize its capabilities much more effectively than a dynamic one.
Ultimately, the answer to the best bitrate for Streamlabs is quite arbitrary.
6. Choose the Theme
Themes are an incredibly valuable feature of the OBS Studio software, enabling you to automate many scene and source configurations. They do not affect the appearance and visual appeal of the stream; rather, they focus on better showcasing the overall essence of the channel.
This means that less experienced streamers will benefit the most from themes, while more advanced streamers can modify them further to suit their preferences.
Each theme includes several settings that you will need to modify to fully align it with your streaming style, but this is typically achievable in just a few clicks.
Two additional advantages of themes as a whole are that they are entirely optional, meaning you don’t have to install one at all, and you can switch between them at any time, making the entire feature much more user-friendly than it would be otherwise.
7. Add the Widgets
Widgets are small pieces of third-party software designed to enhance your Streamlabs OBS experience, making it more intuitive and easier for your audience to navigate during your live streams. Some widgets are pre-made and cannot be further adjusted, while others can be customized to your preferences, making them essential for setting up Streamlabs.
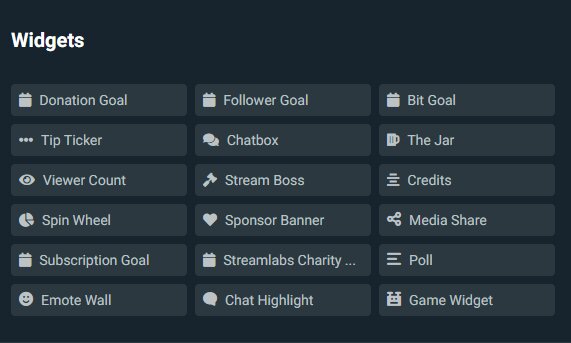
Premade Widgets
The premade widgets are located in the widgets tab of the Streamlabs app. Simply find the one you like and install it. Once installed, the device will be automatically added to your selection of widgets.
You can then add the widget to your stream in the sources tab by selecting the browser source to include widgets and pasting the widget’s URL.
Custom Widgets
Some widgets can be further refined to enhance their appeal for your stream or include additional features and built-in customization tools.
For example, a monetization widget can include links to your donation tab, or you can create a widget that directs users to your pages on other platforms such as YouTube, Twitch, or even Instagram.
You can also create and utilize custom Twitch alerts from this menu, which you will come to appreciate as your streaming career advances.
8. Configure Twitch Stream
Streaming on Twitch using OBS is straightforward and simple. All you need to do is install the app and then click on the settings cog icon in the top left.
Click on it, then select the streaming tab. Choose Twitch as your streaming platform, and log in to your Twitch account.
Finally, you will be prompted to grant the Streamlabs app access to your Twitch account. Once you do this, you are ready to start streaming.
How to Start and End a Stream
Starting a stream on Streamlabs OBS is very simple. After connecting your Twitch account, the app will display a Go Live button in the bottom right corner. Click the button, select the title and stream category, such as the game you will be playing, and then click confirm.
Click on the new Go Live prompt to begin your stream.
Ending a stream is also straightforward. You can do it automatically using the advanced scene switcher, which will end your stream after a specified duration. Alternatively, you can manually end your stream at any time by simply closing the app.
Conclusion
With numerous features that simplify streaming, Streamlabs is arguably the best stream overlay maker available today. The Streamlabs dashboard is well-organized, making this streaming software user-friendly and easy to integrate with your Twitch channel.
Similarly, the widget themes and reasonable internet speed requirements make Streamlabs an excellent choice for both live streamers and content creators.
FAQ
How do I stream games on Streamlabs?
Streaming on Streamlabs OBS can be done both on a PC or laptop or through the mobile app. In either case, the features of the app are easy to learn and add a new depth to your stream as you go live.
What can Streamlabs OBS do?
Streamlabs OBS provides the user with a variety of features that make your live stream more visually appealing to the viewer. It can also enhance the streaming platform by adding options it doesn’t have or making them easier to use.
Is it better to stream on OBS or Streamlabs?
The choice of streaming software will largely depend on your personal preferences, as both are free to download, and there are no real advantages to either, except that Streamlabs is perhaps visually better due to the themes it has.
