If you have ever attempted to stream, you likely understand that audio quality is one of the most crucial elements to maintain, even more so than video quality.
However, regarding audio settings, the default configurations often prove inadequate, particularly with loud noises generated by your keyboard. If you have a mechanical keyboard, you will need to fine-tune your audio signal further. Here is a guide on how to reduce keyboard noise in Streamlabs OBS.
Let’s explore advanced audio settings. Audio filters can assist you in suppressing and removing background noise, enhancing the quality of your content.
Table of Contents
How to Remove Background Noise in Streamlabs OBS
To address background noise suppression and minimize keyboard clicks in your audio recordings, the first step is to adjust various settings in Streamlabs OBS.
Before considering a noise suppression filter or a noise gate filter, it’s advisable to first adjust the audio monitoring settings to eliminate background noise.
After that, you will work on suppression levels in the audio tab and experiment with various filters to create truly personalized content.
Here are the steps you need to follow in Streamlabs to set everything up:
1. First, open Streamlabs OBS Studio.
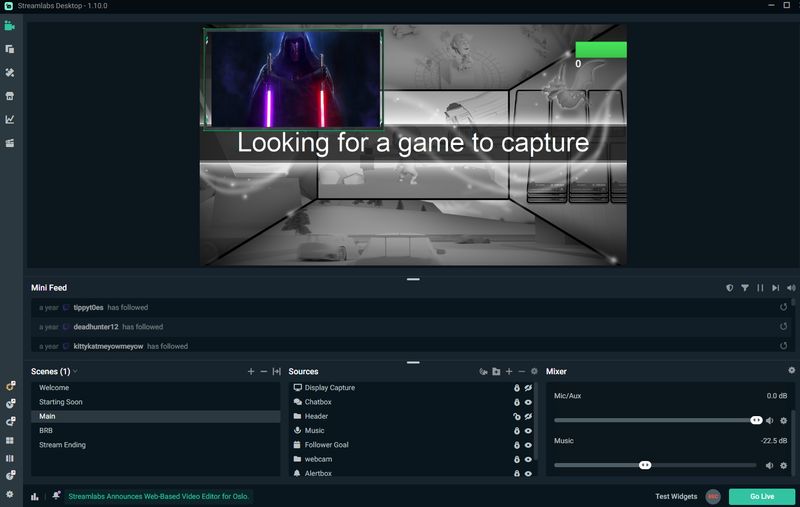
2. Look at the bottom right corner of the window and locate the Mixer section.

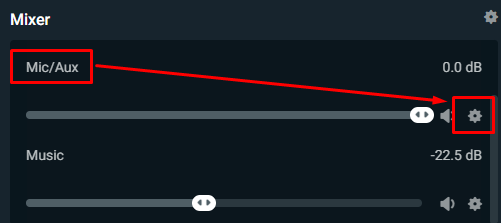
3. Next, locate the Mic/Aux option and click on the gear icon button.
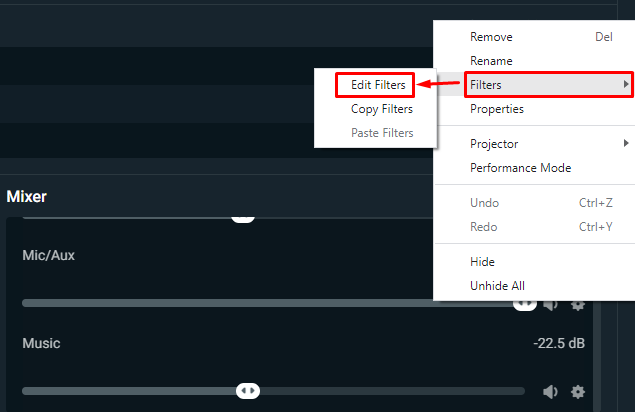
4. A drop-down menu will appear. From this menu, click on the Filter button, and then select Edit Filter.
5. The Source Filters window will now open, and in it, you should see the + New Filter button located on the left side.
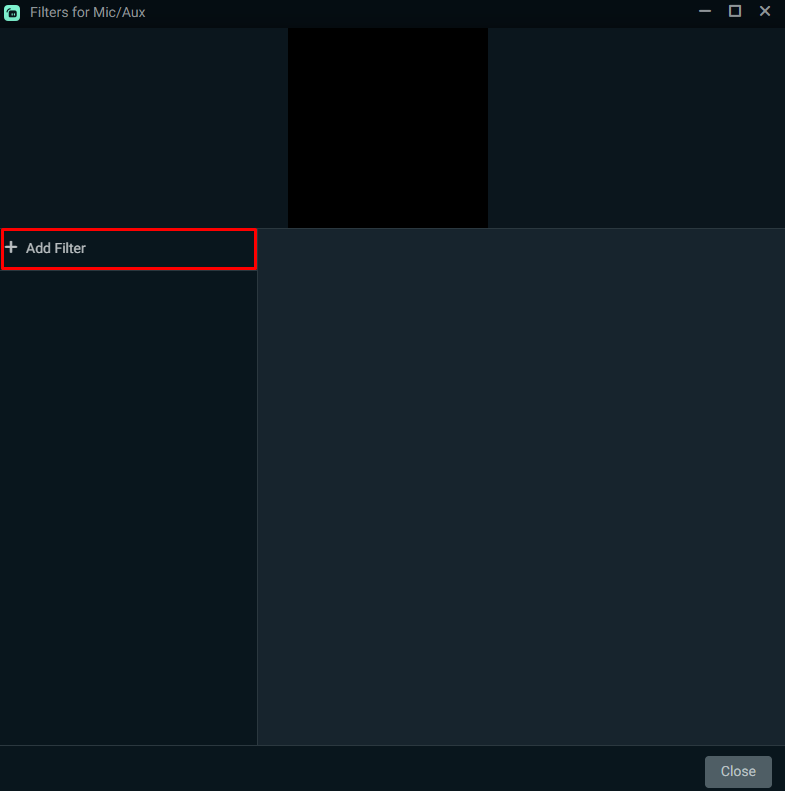
6. Now, you can choose properties and various filters to experiment with until you discover a method to completely minimize the noise from your keyboard.
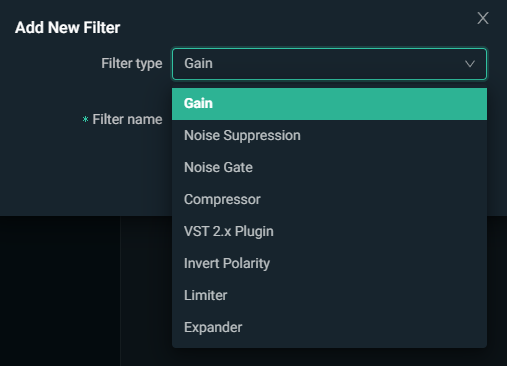
The key aspect of this is that each time you experiment with a new feature or filter for your noise and microphone, you must test it and listen to the recording yourself until you determine what sounds best.
Using a Streamlabs Noise Suppression Filter
When you add a filter, a filters window will appear, displaying three different filter options for you to explore.
The first feature you can explore is the Noise Suppression level filter.
When it comes to this filter, you can choose between two different methods.
The Speex and RNNoise filters differ primarily in their CPU usage, with the latter requiring more processing power.
When you select RNNoise, it typically delivers high-quality audio; however, it may not effectively eliminate keyboard noise.
If this occurs, try using Speex and adjust the threshold accordingly.
In most cases, the default setting is -38. If that doesn’t work for you, try adjusting it up or down, but it is generally best to keep it between -25 and -40.
Remember to test how everything sounds as you make changes.
Using a Noise Gate Filter
The noise gate filter in Streamlabs is highly customizable, making it very effective for reducing background noise.
Here’s what you can achieve with all the available noise gate settings:
Open Threshold
This aspect of the sound settings allows you to set your desired decibel level. This means that once you select a specific number of decibels on this threshold, sounds lower than that will not be captured by your microphone.
The optimal choice is typically 20dB; however, it is essential to experiment and determine what works best for your specific microphone, as different microphones perform better with varying settings.
Close Threshold
This feature is the opposite of the one previously described, meaning that any sound exceeding the decibel level you’ve set will not be captured as background noise by your microphone. Typically, your close threshold should be at least 5dB lower than the open threshold.
In addition to these options, the noise gate window presents three more settings to experiment with. If the previous two options do not yield the desired results, you can try adjusting these as well. However, it is generally advisable to keep these adjustments close to the default values you started with.
Using an Expander to Eliminate Background Noise
The third option in the Add Filters window is the Expander section. Its primary function is to distinguish between loud and soft sounds, amplifying the loud sounds further while reducing the soft ones even more.
With these settings, you will find two different presets, and here is what they can do for you:
Expander
This option controls the light sounds and reduces their intensity by adjusting your audio signal to a low ratio and a low release time.
Your ratio should typically be lower; if it increases, it may lead to issues where no sound is captured. A good balance to aim for is 4:1.
Gate
When you use this preset, it configures your audio recording to a high ratio and a long release time. For the release time, it is generally advisable to keep it between 50 and 120 ms.
Using Limiter Limiters for Background Noises
If there is a loud background noise that you want to prevent from interfering with your audio mixer settings, then this option will likely offer the suppression level you require.
There are two different settings you will need to adjust regarding the limiter:
Threshold
With this, you need a specific limit for unwanted decibels, and the limiter will then adjust sounds that exceed that limit. Typically, the optimal limit is around -8.
Release
This second feature determines the duration for which the limiter will equalize sounds that exceed the set threshold. In most cases, it’s advisable to keep this setting between 0 and 5.
Bitrate Usage in Streamlabs OBS Studio
Another important factor that can influence not only your overall audio quality but also what is input into your audio mixer is the bitrate being used.
The appropriate bitrate for your specific streaming needs will depend on the quality of your stream, or more precisely, on the number of frames per second your stream has.
Here is a list that indicates the appropriate bitrate to select based on the quality you are streaming:
It’s important to keep this in mind when attempting to display personalized content from your computer, as the bit rate can significantly affect how your stream sounds to the audience.
Conclusion
Your sound quality significantly affects how your content is perceived. While purchasing a good microphone and having an overall solid setup can greatly enhance that quality, you will often need to make additional adjustments to achieve perfection.
The filters available with Streamlabs OBS can be extremely helpful, and they are generally easy to use.
If you have a loud keyboard, it’s essential to adjust these settings, and those who watch you will greatly appreciate your efforts.
FAQ
How do I get rid of the keyboard sound in Streamlabs?
The best way to get rid of the keyboard sound when you’re streaming with Streamlabs is to go into audio settings and set up the available u003ca href=u0022https://streammentor.com/how-to-make-microphone-sound-great/u0022 target=u0022_blanku0022 data-type=u0022URLu0022 data-id=u0022https://streammentor.com/how-to-make-microphone-sound-great/u0022 rel=u0022noreferrer noopeneru0022u003eaudio filtersu003c/au003e on different levels.u003cbru003eu003cbru003eYou will need to play around and test a few different options until you find the one that sounds the best.
How do you get rid of static noise in Streamlabs?
To get rid of the static noise when you’re streaming with Streamlabs, the best way to do so is to go into the audio settings and play around with filters for noise gate and noise suppression until you reach the best option for your particular mic.
