If your audience has expressed concerns about Twitch audio, you may need to adjust a few settings in the software.
Twitch noise and OBS microphone issues being too quiet are common problems that many streamers encounter, but fortunately, they are easy to resolve.
These are the best OBS audio settings you can use for streaming if you are just a beginner:
Adjusting Microphone Volume
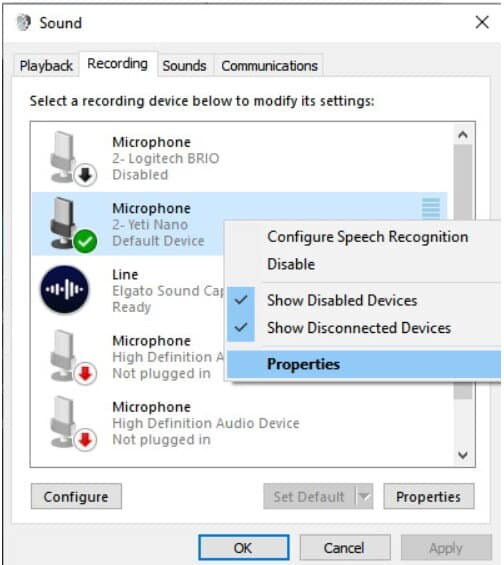
1. Open Sound Settings on your PC
2. Find the Microphone device listed > right-click on it > click Properties
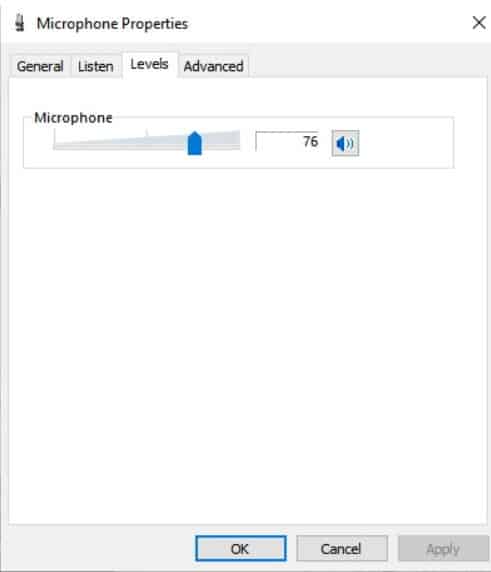
3. Click on the Levels tab
4. Adjust the microphone volume to somewhere between 70-80
5. Press OK and open OBS
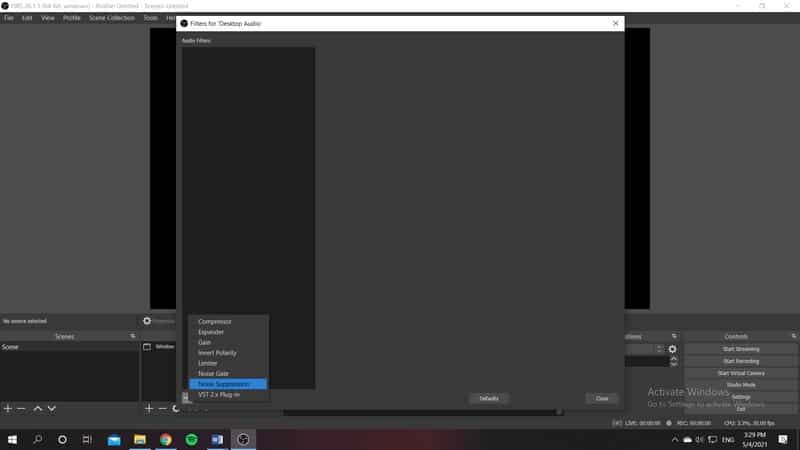
OBS Audio Filters
To add Filters, go to Audio Mixer, click “cog icon” and then “Filters”. Click “+” to Add New Filter.
1. Noise Suppression - start with -10dB and go lower if the noise is still present;
2. Noise Gate
- Close Threshold to -32dB;
- Open Threshold to -26dB. Adjust if needed;
3. Compressor
- Ratio 4:1;
- Threshold: start with 0 and adjust;
- Output Gain: lower until you are not in the red zone
4. Limiter
- Release Time: don’t go over 100ms
- Threshold: start at 0 and adjust from there
Are you looking to enhance mic quality on OBS?
If you want to learn more about OBS audio settings for streaming and how to increase mic volume in OBS, continue reading this guide!
Optimal OBS Audio Settings for Twitch
Most streamers cannot afford to rent a professional studio each time they go live, so it is not surprising that many encounter sound issues during their streams.
At times, it is too low; at other times, it is too high.
They go through extensive trial and error to determine the best settings and address the issue of low Twitch volume.
If you are facing the same issues, I have a few tips—here are the optimal OBS mic settings.
1. Adjusting the settings on your computer
Before launching OBS and adjusting the settings, let's concentrate on the changes you need to make in your PC settings.
If you haven't yet connected the microphone you intend to use during the stream to your PC, please do so now, and then continue reading.
First, you need to open the Sound settings on your computer.
You should see the microphone listed alongside other devices that your PC is using as a sound source.
Select the microphone, then open Properties.
A new window should appear, displaying several different tabs. For now, let's concentrate on the Levels.
There isn't a specific rule for selecting the levels of your microphone, but based on my experience, I recommend that anything between 70 and 80 is ideal.
You can now close this tab and open OBS.
2. Audio Filters
You can locate the audio Filters in the Audio mixer.
Noise Suppression
Now, either right-click on the screen or tap the “+” icon to choose Noise suppression.
This feature allows you to effortlessly eliminate any unwanted background noise, such as traffic sounds or the noise from a fan in your room.
The level of noise suppression is expressed in dB.
To begin, select -10 dB and verify whether the unwanted sounds have been eliminated.

If they are not, lower the level further and conduct constant testing to determine at which point the noise is no longer detected by the mic.
Noise Gate
Now, it is time to add another filter, which is the Noise gate.
This filter has a feature similar to that of noise suppression. It further aids in eliminating unwanted sounds. If an alarm goes off during the stream, the noise gate will ensure it is removed, allowing your audience to watch the stream without distractions.
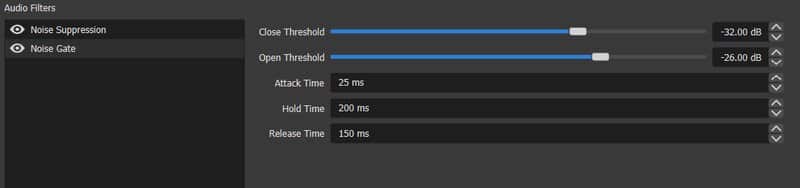
There are two meters you need to adjust - I will first discuss the Close Threshold.
To set the level, speak very softly into the mic. Ensure that you are using a natural tone while doing so—a tone you would likely use during the stream.
Speak into the microphone and gradually adjust the Close Threshold levels to determine at which setting you can no longer hear your voice.
Now that you’ve established the value for Close Threshold, selecting the value for Open will be straightforward.
This value should be just a few decibels higher. For instance, if the value for Close is -40 dB, the level for Open should be -38 dB.
Compressor
The compressor performs the opposite function of the noise gate and noise suppressor; therefore, it can assist you in addressing the issue of the OBS mic volume being too low.
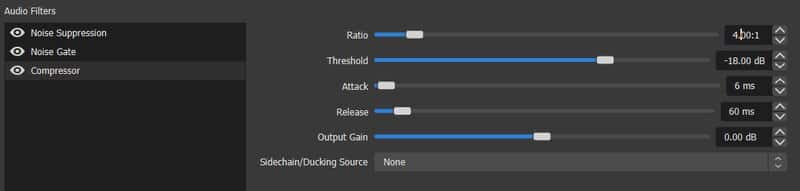
Even if you've already set a relatively high level for your microphone in Windows settings, the sound may still require a slight boost, and the compressor will enhance mic volume in OBS.
Additionally, the issue of audio distortion on Twitch will also be addressed.
There are a few adjustments you need to make here:
Limiter
This is the final component; together with the compressor, it ensures that the microphone sound is never excessively loud.

For release time, do not exceed 100 ms.
For Threshold, begin at 0 and continue speaking loudly; this is the only method to establish the correct value.
Related: Best OBS Settings for Twitch
A Few Additional Tips
Some issues arise from the improper use of equipment, specifically the microphone. Here are a few additional tips:
1. Check which side of the microphone you are using.
Every microphone has two sides, so low sound levels may result from speaking at the wrong angle or into the back of the mic.
2. Check the distance
Unwanted noise can result from not maintaining the proper distance from the mic.
The microphone will capture more background noise if you are positioned too far away from it.
If you are positioned too close to the mic, the audio will become more distorted.
Learn more about it in our video:
Conclusion
We hope this article on setting up audio for Twitch streaming has assisted you in configuring the optimal audio settings for your next stream.