One of the advantages of using SLOBS is that it provides access to numerous widgets, eliminating the need to rely on third-party apps.
Today, I will be talking about the SLOBS countdown timer.
1. Enable Cloudbot on your Streamlabs profile on the website;
2. Click on “Add Timer”;
3. Name your new timer;
4. Write the Response message for your viewers to see;
5. Set the message interval;
6. Set up the line interval;
7. Click “Save”;
The timer is very useful for announcing the stream and informing viewers about when you intend to go live.
Without further delay, let’s start this Streamlabs countdown timer guide!
Table of Contents
What is the Streamlabs Timer Widget?
The Streamlabs OBS countdown timer is a message that automatically appears at the scheduled time.
Streamers use this widget to either count down to the start of the stream or to announce when they will return (for instance, if they take a short break during the stream).
The SLOBS countdown timer is among the most popular widgets, and this time, I will discuss how to add it to your stream.
How to Add a Countdown Timer to Streamlabs OBS?
Adding the Streamlabs countdown widget is a straightforward process. Even if you are new to the program, you will easily be able to implement it into your live streams.
These are the steps:
1. Enabling Cloudbot
The first step is to visit the Streamlabs webpage.
Enter your login information, then open the Cloudbot tab.
Activate this feature.
If it is already on, you can proceed to the next step.

2. Add Timer
Next, locate the “Add timer” button and click on it to create a Streamlabs timer.
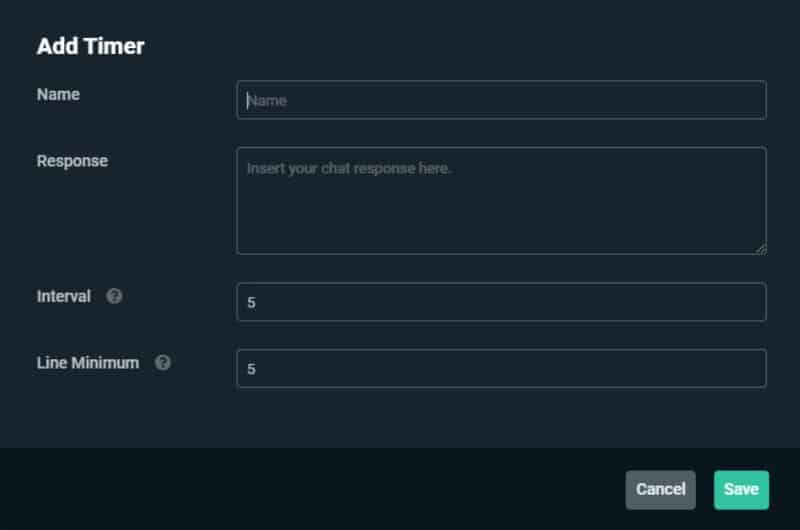
A pop-up window will appear on your screen containing several settings.

Below is the meaning of each one.
Name
First, you need to name the timer.
It is advisable to select a name that reflects the timer’s function (for instance, stream start), particularly if you intend to use multiple Streamlabs OBS timers during the stream.
Response
Response is a message displayed on the screen for the viewers.
Remember that it must be concise – you can use a maximum of 500 characters.
Additionally, you can include various parameters. The definition of each can be found on the official website.
Interval
The interval will determine how frequently messages appear in the chat. This allows you to slow down or speed up the chat based on the number of viewers and participants interacting in it.
The message can be displayed every five minutes, every 15 minutes, or even once an hour if necessary.
If you are adding multiple timers, ensure that they do not overlap; this can occur if the interval time for each is set too low.
Line Minimum
This setting pertains to the number of messages shown in the chat before the SLOBS timer expires.
When additional timers are added, adjust the line minimum a few times as necessary to prevent the timers from overlapping.
Conclusion
In today’s streaming guide, I discussed the SLOBS countdown timer. We explored what it is, how to set it up, and how to use it effectively.
I hope you found this guide helpful and that it will assist you in improving your streams. If you have any additional questions, please refer to our frequently asked questions below. Alternatively, if you have something specific in mind, feel free to leave a comment and let us know.
Related: How to Add Music to Streamlabs OBS
Frequently Asked Questions
How to turn on Cloudbot?
This feature is placed on the sidebar navigation. To turn it on, just click on the toggle.
What is the recommended setting for the interval?
In case you have multiple timers, it would be best to use these intervals: 5/7/9/12. Also, make sure to adjust the line minimum accordingly. You will find the best setting by trial and error.
