Have you ever wanted to enhance your audio and video streaming quality without spending too much money?
We are introducing a fantastic app that will enhance the sound quality of your productions for streaming and beyond.
In this article, we will discuss what the OBS compressor is, why it is used, and the best ways to utilize the OBS compressor settings.
Let us begin!
What Is the Compressor and What Is It Used For?
The compressor is designed to eliminate unwanted background noise, enhancing the quality of audio and video sound.
Its primary function is noise suppression.
It makes loud noises sound quieter.
These are typically static noises that everyone can hear in the uncompressed audio background.
Thanks to the audio filters available in the compressor filter settings, these static noises will be eliminated at the start of the filter chain.
If you excel in Physics, you will observe that the compressor in OBS functions in a similar manner.
How to Use the OBS Compressor?
In this section, you will find a step-by-step explanation of how to adjust the OBS compressor settings.
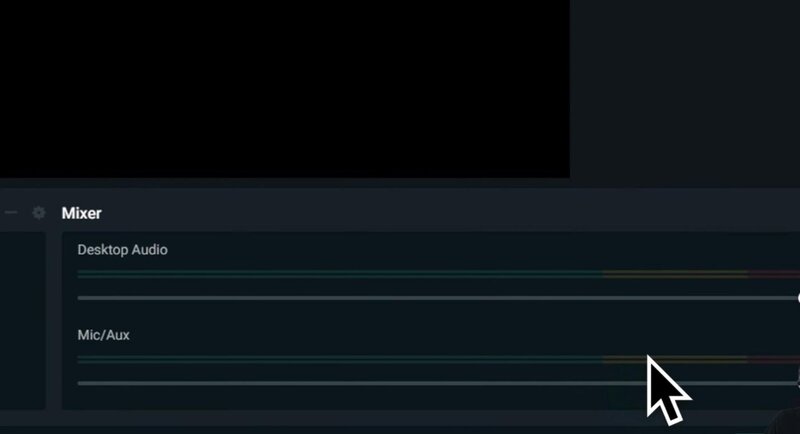
Step 1: Locate the Audio Mixer in OBS
Navigate to the OBS Studio main page and locate the Audio Mixer window at the bottom of the page.
Step 2: Choose Audio Source
Open the Audio Mixer window and click on the gear icon.
Select the audio source to which you want to apply compressor filter settings.
The steps for setting the OBS compressor are largely the same for both options where you want to add filters: Desktop Audio or Mic settings.
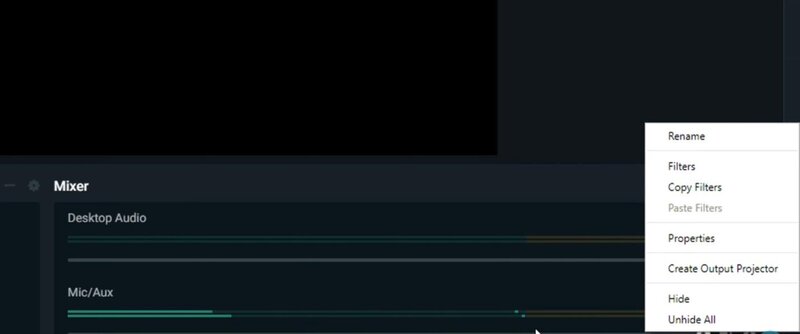
Step 3: Access Filter Settings
Click the cog icon next to one of the options, and then select Filter settings.
A new window will open, allowing you to click on a small + icon in the upper left corner of the Filters page.
Step 4: Select the Audio Filter
By clicking the + icon in the Filters window, you can select the audio filter you wish to add.
It is crucial to emphasize that you should prioritize your compressor first, followed by other settings such as VST plugins.
When you select Compressor, please confirm the action by clicking on Done.

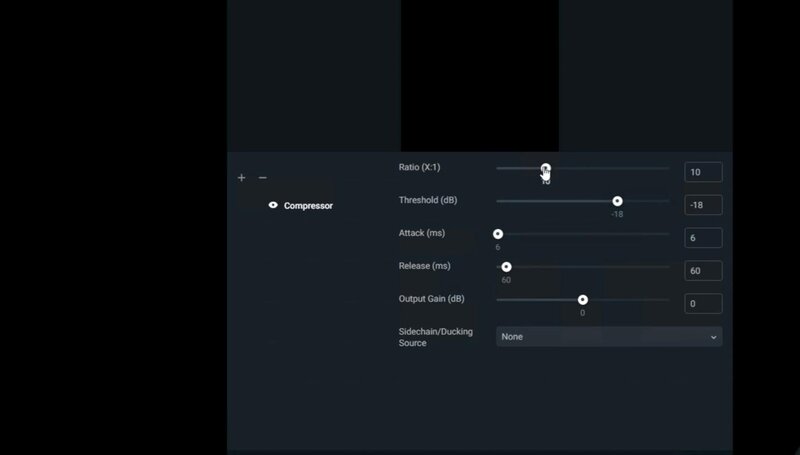
Step 5: Edit Compressor Filter Settings
Now, it's time to configure all the compressor filter settings. These settings include Ratio, Threshold, Attack, Release, Output Gain Filter, and Sidechain Compression.

Step 6: Complete Editing and View the Result
Once you have adjusted all your compressor filter settings, confirm them by clicking the Done button.
From now on, thanks to the audio processing chain, you can enjoy your streaming ritual until the end.
Detailed Compressor Filter Settings
In the previous section, you learned how to use the OBS compressor step by step. However, you should continue reading, as we will explain in greater detail how to properly adjust the audio filters.
It is important to note that default compressor settings are often poorly configured, so you should adjust them accordingly.
Prepare for more!
Ratio
If you usually stream with a microphone, we recommend that your ratio setting be no higher than 3.
The most common ratio is 16:9, as this is the ratio that major streaming platforms, such as Twitch and YouTube, expect from you.
The compression ratio is used to adjust the audio sound according to your preferences.
Threshold
The threshold setting may depend on the volume of the incoming audio source.
If it is coming in quietly, it is better to move the Threshold all the way down; this will cause your audio signal to become very quiet on OBS.
Conversely, if you have a poor audio signal, you should set it to -20.
The threshold setting adjusts the maximum level of the audio source permitted in streaming.
Attack and Release
When discussing the Attack setting, it should always be set to the lowest possible level. This ensures that all loud sounds are compressed, allowing viewers to clearly hear what you are saying.
That would be a great starting point for improving your streaming.
Let's move to the Release setting, which is typically effective at 60 or 50 milliseconds.
The primary function of the Release is to indicate how quickly the gain reduction will cease when the audio level falls below the threshold you have established.
What you want to achieve is the total gain reduction that the compressor will provide initially when the audio level falls below the Threshold.
Output Gain
The Output gain is something you should always increase, as it lowers the normal level of the signal.
When the level is automatically reduced, unwanted noise enters immediately.
The most effective way to adjust it correctly is to monitor the Mixer signal located in the bottom right corner of your screen.
If you notice it is reaching the red zone, it is too loud, and you should probably lower it until it reaches the yellow zone.
You can achieve a boost of up to 9 dB or more if desired.
Sidechain/Ducking
This is one of the audio device filters that people tend to avoid because it involves the most complicated process, which likely requires another review for clarification.
It enables the compressor to "duck" another audio source while you are speaking.
For instance, if you have background music or gameplay music, you can easily connect these audio sources using Sidechain compression.
Optimal Compressor Filter Settings
The optimal OBS compressor setting is a minor adjustment that can significantly enhance your streaming quality.
However, there are numerous OBS filters you can adjust that can be very helpful.
Check out our list of the best OBS compressor settings and discover how you can enhance your streaming.
Limiters
Limiters are a specific type of compressor designed for use at the end of an audio processing chain.
They are used to restrict the audio level above the minimum.
Invert Polarity
This filter set serves a single purpose: to address phase cancellation issues.
These issues lead to unwanted changes in volume and tone during the mixing process.
They typically influence the highest quality sound productions.
Gain Reduction
Gain should be lowered before capturing in the OBS to minimize loud noises.
That is what OBS Studio always recommends first.
It is essential to note that this filter can be used with various audio devices.
It can enhance your volume and decrease gain where needed.
Expander
This is one of the best OBS Studio filter settings because it functions similarly to the main compressor settings.
The only difference between the compressor and the expander is that the expander focuses on low noise suppression.
Noise Gate
The Noise Gate filter is a version B that can be used as an alternative to the Expander filter.
Depending on your audio input, you can adjust the noise level that will be automatically reduced or silenced.
The Noise Gate is simpler to use than the Expander.
You simply need to select the Open Threshold and Close Threshold filters.
Noise Suppression
This filter is highly beneficial as it can eliminate background noise from various audio devices and computer fans.
Keep in mind that this filter is disabled when set to 0.
Setting up noise suppression is straightforward, but be cautious, as this filter can also impact overall audio sources.
VST Plugin
VSTs are plugins that you can add using third-party programs such as OBS Studio.
They enable you to reduce unwanted noises and achieve a dynamic range by adjusting the lower, normal, and high volumes, ensuring they all sound at the same level.
If you use this filter, be mindful of CPU usage, as it may lead to an overload issue.
Conclusion
We sincerely hope this article has helped you understand how the OBS compressor and the other OBS Studio filters function.
Using OBS Studio filters along with the right microphone can greatly enhance your streaming skills, as they create a powerful combination.
If you have any additional questions, please let us know. Feel free to read the FAQ section below, which may be helpful.
FAQ
Should you use a compressor OBS?
What compressor settings should I use?
The highest number in your ratio setting determines the best audio quality you can achieve, while the lowest number indicates the amount of compression you can apply to your entire mix.
Threshold settings are important because they determine when the compressor will activate. This means you can set a specific point at which your audio signal will begin to be compressed.
What does a compressor filter do?
How do I hear myself on OBS?
Next, navigate to the advanced OBS audio settings and select the Mic/Aux option. On the right side of the screen, you will see the Audio Monitoring drop-down menu. Select the Monitor Only option. After completing this final step, you will be able to hear yourself on OBS.