During the stream, there will be many hilarious and exciting moments that you will likely want to re-watch and enjoy again.
That's when Twitch clipping comes into play.
This feature allows you to save your favorite moments from the stream, archive them, and re-watch them whenever you like.
So, how do you create a clip on Twitch?
In this guide, I will address this problem, so without further ado, let's begin!
Making a Twitch Clip on PC
1. Sign in to your account
2. Turn on the game you plan on streaming, launch the streaming software and start the broadcast
3. Create the clip (click on the icon for Clip on Twitch, on the bottom right corner of your screen)
4. Twitch Clip pop-up window will show up, and you need to pick the desired length of the clip (between 5 and 90 seconds)
5. Name the clip
6. Share the clip, if you want
Making a Twitch Clip on Smartphone
1. Download the Twitch app (android or iOS)
2. Start the game
3. Tap the Clip icon
4. Twitch will capture the last 30 seconds of the stream (if that is not what you wanted, you can edit the clip by trimming its length)
5. After you are done, you can share the clip by taping the “Share clip” button
What is Clip on Twitch?
Clipping on Twitch enables you to capture short videos (usually up to 90 seconds long) from the ongoing stream.
The feature is accessible to both viewers and streamers—clips are organized in separate folders, allowing you, as a content creator, to identify which moments your viewers find most engaging.
Later, you can share these clips on other social media platforms to promote the stream. By understanding which moments resonated most with the audience, you will know how to improve your next stream.
It is a very useful tool, and this time I will discuss how to clip a Twitch stream.
How to Create a Twitch Clip?
There are various methods to create Twitch clips, depending on the device you are using.
Since most streamers broadcast from their PCs, I would like to start by discussing how to create clips on Twitch using a Windows or Mac computer.
1. How to Create a Clip on Twitch Using Your PC
The first thing you will need to create clips is the Twitch desktop app.
If you haven't obtained one yet, I recommend downloading it before proceeding to the next step.
The clipping will also function on the browser app, so downloading the app is not necessary.
Log in to your account
This is the step for streamers who are using a browser instead of the app.
First, you need to log in to your account.
After that, you can launch the game you intend to stream, open the streaming software, and begin the broadcast.
Create the clip
This step is very simple.
During the stream, if any moment is especially interesting, simply click on the Clip icon on Twitch.
It is positioned at the bottom corner of the screen, adjacent to the gear icon.
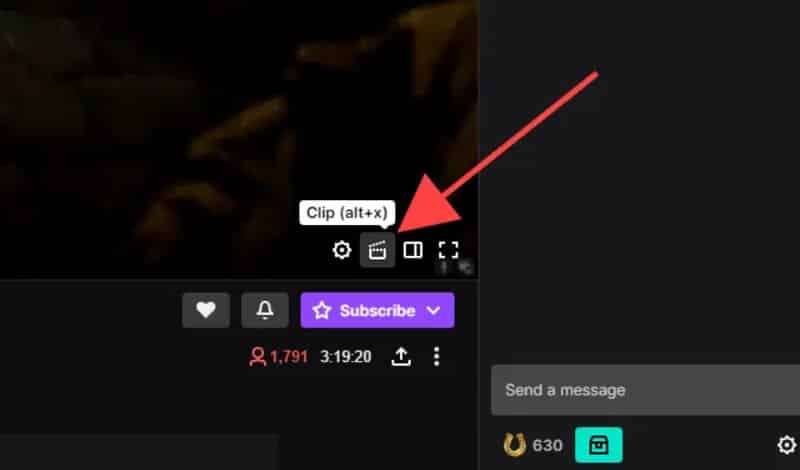
You can also use a shortcut to access this feature more easily.
If you are using Windows, the shortcut for Clip is Alt+X; for Mac users, it is Option+X.
While streaming, it is likely more practical to use the shortcuts, so remember these two options.
Twitch Clip Pop-up Window
As soon as you click the Clip icon, a pop-up window will appear on your screen.
Below, you will find a video along with a timeline. Twitch automatically selects the last 90 seconds of your stream.
This doesn’t mean you must capture those 90 seconds; you can adjust the timeline as you prefer and create even shorter clips.
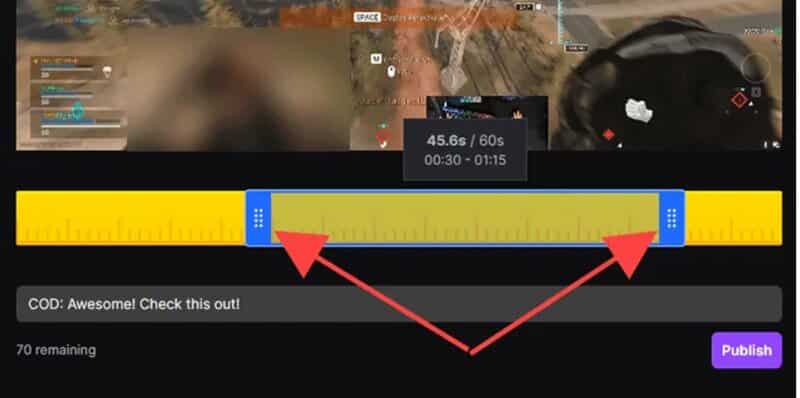
Remember that the video must be at least 5 seconds long.
Name the clip
All captured videos are automatically saved and published.
Before it is added to the archive, you need to name it. Since the video will be public, ensure that the name is catchy.
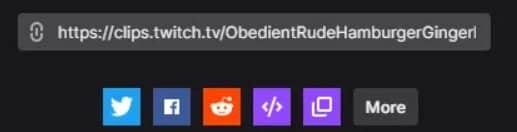
Share the Video
Now, you can share the video on various social media platforms.
You can instantly add it to Twitter, Reddit, and Facebook.
You can also copy the link to the clip.
2. How to Create Twitch Clips on Your Smartphone
You can create Twitch clips on Android and iOS as long as you have the Twitch app installed on your smartphone.
If you are a streamer, you likely won’t create many clips using your phone, as streaming from a smartphone is somewhat impractical.
However, for viewers, it is equally convenient as doing it on a PC.
Let’s explore how to create clips on Twitch.
Related: How to Stream IRL on Twitch
Download the App
As mentioned, it is essential to have the Twitch app if you wish to create clips using your phone.
Once you have the app, enter the login information.
If you are a streamer, launch the game you wish to stream and begin the live broadcast.
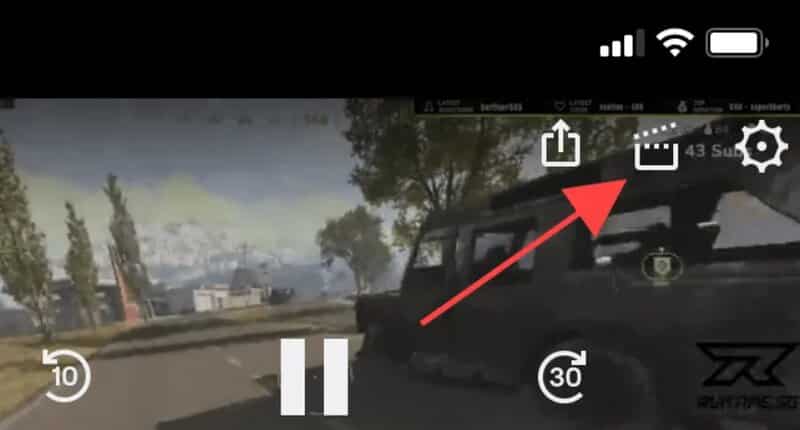
Clip Icon
There is no shortcut for creating clips on your phone, so you will need to use the Clip icon to capture a specific moment.
Edit and Share
Twitch will record the last 30 seconds of the stream, allowing you to share that moment without any editing if it is the one you wanted to capture.
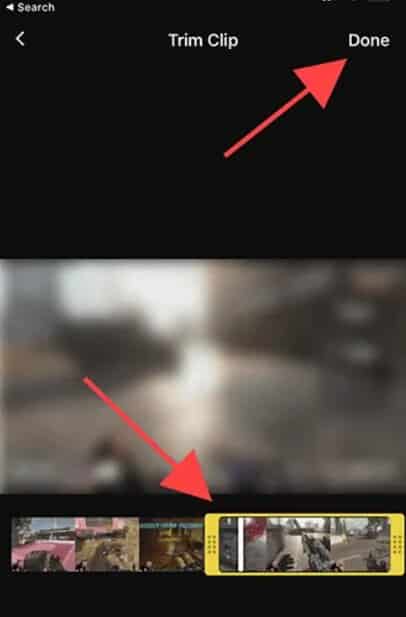
There is also a Preview and Edit feature.
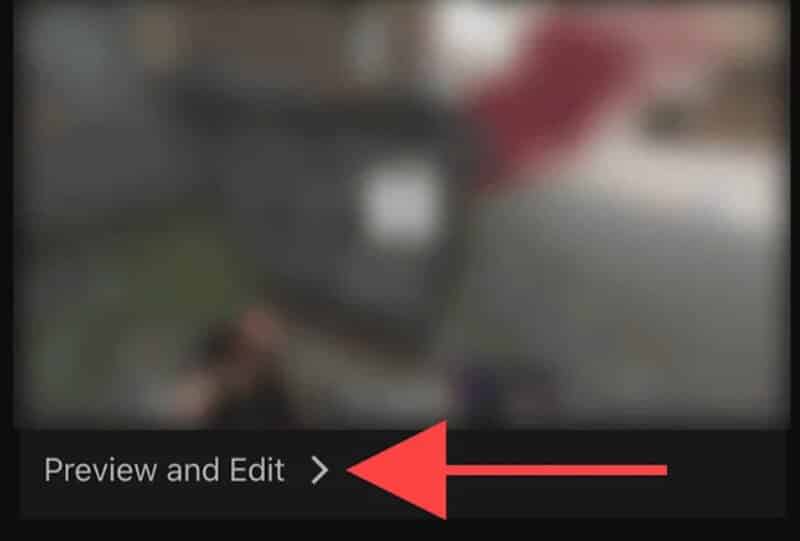
With the Trim option, you can adjust the video's length and select the specific moment you want to capture.
Once you have finished editing, click on Done and then select Publish.
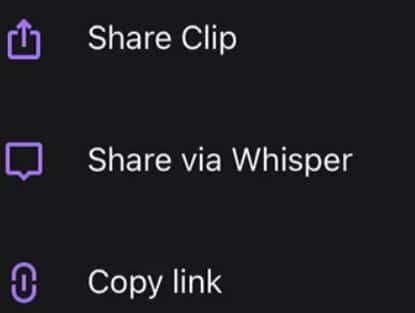
When you choose to publish a video, you will have three options.
There is a Share Clip option that enables you to share the link via messaging apps on your phone.
Additionally, you can use Whisper to share the clip or simply copy a link.
Managing Twitch Clips
As mentioned, all the clips you create are published automatically—immediately after they are made, your followers on social media can view them.
To gain greater control over the management of your Clips, you should visit the Clips Manager.
Keep in mind that this feature does not work on the desktop app; you must access the account through a browser.
Once you have logged in, here is what you need to do: