A valuable feature on Twitch for both established and emerging streamers is the ability to add stream labels.
This is one of the streaming tools that you can integrate through the streaming software you are using, allowing you to add labels for items such as new followers.
If you’re using OBS Studio or Streamlabs as your preferred streaming software, you’ve come to the right place. Here, you’ll find detailed guides that explain everything you need to know about stream labels for both of these programs. So, let’s get into it.
Table of Contents
What Are Stream Labels?
When watching other streams, whether it’s a laid-back, just chatting type or high-quality tutorials, you’ve likely noticed overlays on the screen that inform the streamer about various interactions, such as the most recent followers.
Stream label notifications appear as a text overlay and update in real-time based on the interaction that occurred.
Some common examples include labels for donations and tips received, as well as notifications for new followers on your channel.
How To Set Up Stream Labels In OBS Studio
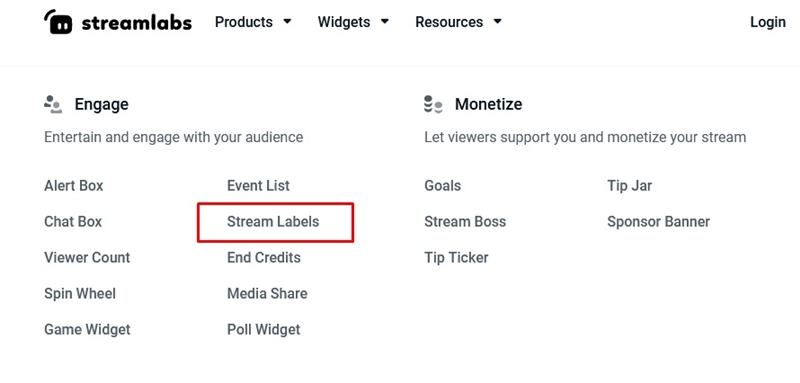
Before setting up labels in OBS, you must download some widgets from the Streamlabs website.

Here are the steps:
Edit Stream Labels From OBS
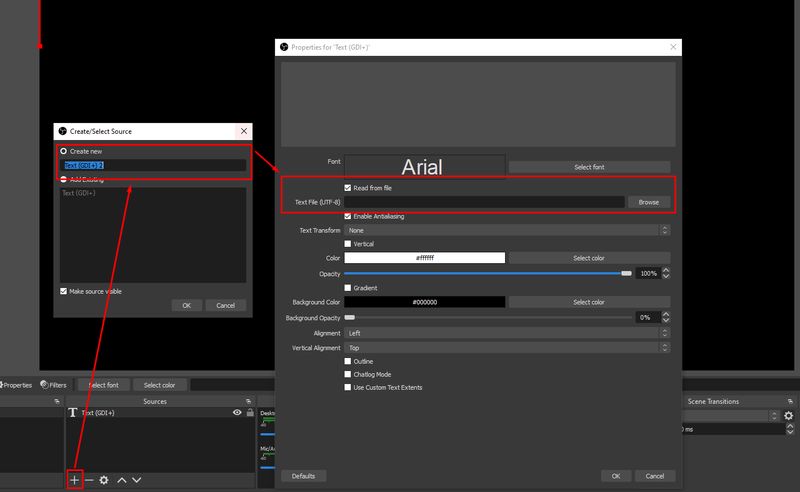
Now that you have downloaded the widget from Streamlabs, you need to set the label in OBS.

Here is how to do that:
When you edit stream labels in OBS with various settings, you can choose which labels to assign for new followers and which ones to use for donations, tips, and any other categories you may desire.
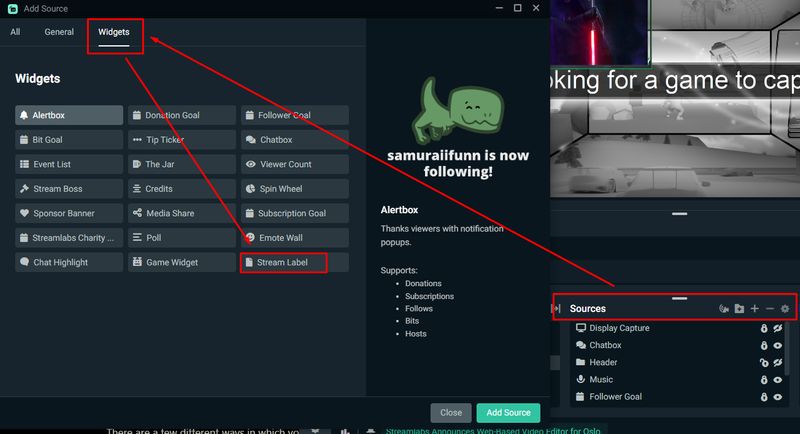
Adding Stream Labels in Streamlabs
Incorporating stream labels in Streamlabs is very straightforward, as this feature is pre-built. Here are the simple steps you need to follow:

And that’s all!
Now, you can focus on customizing your labels to convey your desired message.
Additionally, you can modify how the labels appear on the stream by experimenting with various filter options.
Customizing Stream Labels In Streamlabs
There are several ways to customize and personalize your labels, and here they are:
Adding Filters to Stream Labels
Filters are used to determine how you want your text to appear on the screen, with the Scroll option being the most popular. It’s very easy to implement; you just need to follow these steps:
As you can see, there are many filters to choose from here, so even if you prefer something other than the Scroll option, you will have the ability to do so.
Benefits of Having a Stream Label on Your Stream
The primary advantage of using stream labels is that they clearly engage the audience more, as it is thrilling to see your name displayed on the screen.
Additionally, you can utilize stream elements such as labels to remind viewers to follow you on your other social media platforms, which will likely help you attract more like-minded individuals across all channels.
With each new subscriber, you receive a fee. Therefore, when someone subscribes, it encourages others to do the same, indicating that stream labels also contribute to your monetization.
Finally, when you have the opportunity to receive a notification whenever a new subscriber joins, you’ll be able to thank them personally, creating an overall positive and festive atmosphere in both the stream and the chat.
Conclusion
Stream labels are excellent tools to enhance your stream, making it more dynamic, and they can also be very beneficial for both you and your viewers.
It doesn’t matter if you prefer OBS Studio or Streamlabs as your streaming software; both are easy to set up and customize. Since they offer numerous benefits for your streams, you should definitely consider using them.
FAQ
What is a stream label?
Stream labels are used to indicate different viewer interactions that occur during a stream.u003cbru003eu003cbru003eFor example, when you get a new subscriber, a stream label will pop up to notify you about that.
How do I make a stream label?
To get a stream label, you first need to get a widget from the u003ca href=u0022https://streamlabs.com/goprime?promo=streammentor-7d87-10u0022 target=u0022_blanku0022 data-type=u0022URLu0022 data-id=u0022https://streamlabs.com/goprime?promo=streammentor-7d87-10u0022 rel=u0022noreferrer noopeneru0022u003eStreamlabs websiteu003c/au003e, install it and then customize it depending on what you want it to say.u003cbru003eu003cbru003eThis can be done in both Streamlabs and OBS Studio.
