Have you ever felt that displaying something on your screen is much easier than explaining it in words? This is a common scenario today, considering how deeply technology is integrated into our lives. Whether you’re creating a tutorial, recording a gaming session with friends, or simply curious about how to screen record on your Mac, using the right tools is essential. Here’s a straightforward guide on the three best screen recording methods for your Mac, complete with easy-to-follow steps and a few professional tips to enhance your recording experience.
Table of Contents
Who Benefits from Mac Screen Capture?
Tips for Selecting an Effective Screen Recorder
When exploring the top screen recorders for Mac, the primary factor to consider is the quality of the recording. The clarity and sharpness of the video are crucial, as they reflect not only on the content but also on our professionalism and attention to detail.
Next, ease of use should be a top priority. An intuitive and user-friendly tool allows all team members, regardless of their technical expertise, to capture and share their insights and ideas.
Do not underestimate the importance of reliability. A dependable screen recorder that functions seamlessly in various conditions ensures that no crucial information is lost during recording.
Finally, privacy and security features are crucial. Protecting our intellectual property and sensitive information is not only essential, but it is also our responsibility.
3 Best Methods for Recording Your Screen on Mac
1. Movavi Screen Recorder

Movavi Screen Recorder is a versatile tool, suitable for a wide range of users, from beginners to professionals. Its interface is highly user-friendly, making screen recording an intuitive experience. The software offers a customizable recording area, allowing users to capture either the entire screen or just a specific section.
It provides options for recording both system and microphone audio, enhancing the depth of the content. Additionally, Movavi Screen Recorder includes basic editing features, enabling users to trim and refine their recordings within the same application.
Features:
To record your screen with Movavi Screen Recorder, follow these steps:
Step 1: Start by downloading Movavi Screen Recorder from the official website and follow the provided installation instructions.
Step 2: Open the program, and a widget featuring simple “Record” and “Screenshot” options will appear. Here, you can adjust the settings to meet your recording needs.
Step 3: Choose your recording area, adjust audio settings, and begin capturing your screen content. Movavi Screen Recorder provides a countdown before the recording starts, which is helpful for preparation.
Step 4: After recording, utilize the editing tools (scissors icon) to eliminate any unwanted sections. Finally, save your video in popular formats such as MP4, MOV, or even as a GIF for versatile use.
2. QuickTime Player
QuickTime Player, Apple’s native multimedia framework, offers a simple and reliable solution for screen recording. It is especially suitable for users seeking a straightforward and no-frills method for capturing screens on a Mac, owing to its installation-free approach.
QuickTime allows users to record the entire screen or a selected area, along with microphone audio, making it suitable for basic tasks. While it does not include advanced editing tools, it provides essential trimming functionality. Being a built-in application, it requires no additional downloads, making it a convenient option for quick screen recording tasks.
Features:
If you choose to use QuickTime Player, there are specific steps you need to follow:
Step 1: Locate QuickTime Player in your Applications folder, or use Spotlight/Launchpad for convenient access.
Step 2: In QuickTime Player, click on “File” and then choose “New Screen Recording” to access the recording interface.
Step 3: Before recording, adjust the settings, such as microphone selection, timer, save location, and cursor or click capture options.
Step 4: Choose whether to record the entire screen or a specific area using the available options.
Step 5: Click “Record” to begin. All actions within the selected area will be recorded. To end the recording, click the “Stop Recording” button in the menu bar.
Step 6 (Optional): After recording, the video will open in QuickTime Player for saving and basic trimming. For more advanced editing, you may need to use external video editing software.
3. Overview of the Mac Screenshot Toolbar
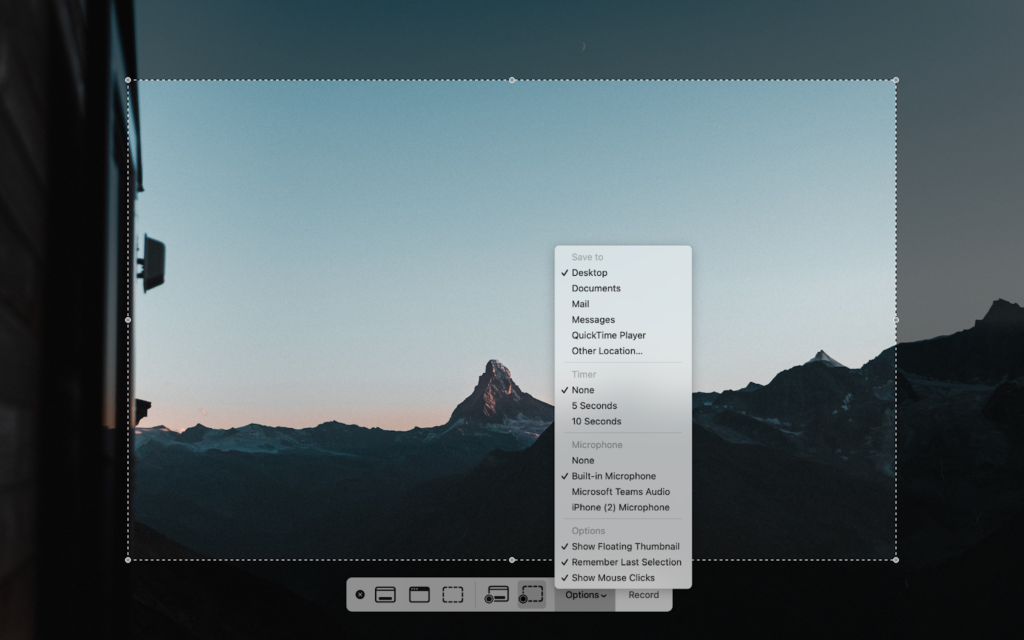
The Mac Screenshot Toolbar is a built-in feature of macOS that offers a convenient way to record your screen. You can access it using the simple shortcut “Shift-Command-5,” which opens a panel of tools for both screen recording and taking screenshots.
This tool is known for its user-friendly design, making it ideal for quick and efficient screen captures. Users can record the entire screen, a specific window, or a selected area, providing flexibility. It also features customizable options such as timer delays and cursor highlights, which enhance the recording experience.
Features:
Using built-in tools is usually the easiest way to record your screen; all you need to do is:
Step 1: Press the Shift-Command-5 shortcut to open the Mac Screenshot toolbar.
Step 2: Select from the toolbar to capture the entire screen, a window, or a specific area.
Step 3: Before recording, adjust the settings, including the timer delay and the options to display mouse clicks or the cursor in the recording.
Step 4: Choose your preferred recording option and start capturing your screen content.
Step 5: Conclude the recording by clicking the “Stop Recording” button in the menu bar. The recording will then be available for immediate review and saving.
Common Pitfalls in Screen Recording
Mistakes in screen recording frequently arise from overlooking crucial elements of the recording process. A typical error is failing to check audio and video settings beforehand, leading to recordings with subpar sound quality or capturing the wrong screen areas.
Many users forget to close unnecessary applications or notifications, resulting in distractions and clutter in the final video. Not planning the recording sequence can lead to unstructured and confusing content.
Moreover, overlooking the export settings frequently results in incompatibility with the intended platforms or reduced output quality.
Finally, underestimating the significance of post-recording editing is a common error, as it can significantly improve the clarity and impact of the screen recording.
Conclusion
In today’s technology-driven world, showcasing a process through a screen recording often exceeds lengthy explanations. This is particularly relevant for those creating tutorials, webinars, or simply exploring the features of their Mac.
While this article primarily aims to provide guidance on recording videos on a Mac, it also seeks to highlight the most user-friendly tools available. These tools simplify the recording process and open up new avenues for creative expression.
